- 只会 Windows 也能轻松搭建远程桌面 RustDesk 自用服务
- Spring—事务及事务的传播机制
- Navicat连接mysql报错2003(10060)
- Ubuntu安装RabbitMq(保姆级教学,直接喂饭)
- SpringBoot(十三)异步任务
- Mysql on duplicate key update用法及优缺点
- Python SQL 数据库操作利器:SQLAlchemy 库详解(看
- Oracle 三种分页方法
- 【MySQL】MySQL的数据类型
- MySQL8.0.32详细安装教程(奶妈级手把手教你安装)
- Tomcat与Netty比较
- MySQL的卸载与安装(Linux)
- 云计算——虚拟化层架构
- SpringBoot中文乱码问题解决方案
- 【MySQL入门实战5】-Linux PRM 包安装MySQL
- @ServerEndpoint注解:2023最新分享,springbo
- 基于PHP和MySQL的新闻发布系统——【功能优化】
- 【爬虫实战】使用Python和JS逆向抖音X-Bogus参数获取N条视
- 数据库实验1 数据库定义与操作语言实验
- PHP-MYSQL学生信息管理系统(附源码免费)
- 搭建流媒体推流拉流服务(RTMPRTSPHLSHTTP-FLV)
- MySQL求和技术:如何轻松计算总和
- Android 获取网络连接状态新方法
- 【Spring Cloud Alibaba】(二)微服务调用组件Fei
- #GET携带Body参数发送请求 #SpringBoot整合Feign
- ShardingSphereJDBC5.4.0支持Nacos配置(Sp
- BaseMapper接口的使用
- MySQL8 详细安装步骤 【附安装包】
- Weblogic 常见漏洞分析与利用
- Springboot开启定时任务Spring Schedule(含业务
文章目录
- 设置通用父工程依赖
- 构建eureka注册中心
- 构建认证授权服务
- 配置文件设置
- Security配置类
- 授权服务配置类
- 登录实现
- 测试验证
设置通用父工程依赖
在微服务构建中,我们一般用一个父工程来通知管理依赖的各种版本号信息。父工程pom文件如下:
    4.0.0
    com.zjq
    oauth2-demo
    pom
    1.0-SNAPSHOT

        commons
        ms-gateway
        ms-oauth2-server
        ms-registry


        2.3.7.RELEASE
        Hoxton.SR9
        1.18.16
        3.11
        2.1.3
        8.0.22
        2.1.5-RELEASE
        5.4.7
        20.0
        1.8
        1.8
        UTF-8


                org.springframework.boot
                spring-boot-dependencies
                ${spring-boot-version}
                pom
                import


                org.springframework.cloud
                spring-cloud-dependencies
                ${spring-cloud-version}
                pom
                import


                org.projectlombok
                lombok
                ${lombok-version}


                org.apache.commons
                commons-lang3
                ${commons-lang-version}


                org.mybatis.spring.boot
                mybatis-spring-boot-starter
                ${mybatis-starter-version}


                com.battcn
                swagger-spring-boot-starter
                ${swagger-starter-version}


                mysql
                mysql-connector-java
                ${mysql-version}


                cn.hutool
                hutool-all
                ${hutool-version}


                com.google.guava
                guava
                ${guava-version}


                    org.springframework.boot
                    spring-boot-maven-plugin
构建eureka注册中心
在SpringCloud微服务体系中服务注册中心是一个必要的存在,通过注册中心提供服务的注册和发现。具体细节可以查看我之前的博客,这里不再赘述。我们开始构建一个eureka注册中心,对应的yml配置文件如下:
server:
  port: 8080
spring:
  application:
    # 应用名称
    name: ms-registry
# 配置 Eureka Server 注册中心
eureka:
  client:
    register-with-eureka: false
    fetch-registry: false
    service-url:
      defaultZone: http://localhost:8080/eureka/
logging:
  pattern:
    console: '%d{HH:mm:ss} [%thread] %-5level %logger{50} - %msg%n'
对应的项目启动类代码如下:
package com.zjq.msregistry;
import org.springframework.boot.SpringApplication;
import org.springframework.boot.autoconfigure.SpringBootApplication;
import org.springframework.cloud.netflix.eureka.server.EnableEurekaServer;
/**
 * 注册中心
 * @author zjq
 */
//启动 eureka注册中心服务端相关组件
@EnableEurekaServer
@SpringBootApplication
public class MsRegistryApplication {
    public static void main(String[] args) {
        SpringApplication.run(MsRegistryApplication.class, args);
    }
}
至此,一个单体的服务注册中心搭建完成。
构建认证授权服务
上文我们已经完成了注册中心的搭建,接下来我们开始搭建认证授权中心。
配置文件设置
我们同样在父工程下面新建一个子工程,作为认证授权中心的微服务。对应的yml文件和pom文件配置如下:
application.yml
server:
  port: 8082 # 端口
spring:
  application:
    name: ms-oauth2-server # 应用名
  # 数据库
  datasource:
    driver-class-name: com.mysql.cj.jdbc.Driver
    username: root
    password: 123456
    url: jdbc:mysql://127.0.0.1:3306/oauth2?serverTimezone=Asia/Shanghai&characterEncoding=utf8&useUnicode=true&useSSL=false
  # Redis
  redis:
    port: 6379
    host: localhost
    timeout: 3000
    database: 1
    password: 123456
  # swagger
  swagger:
    base-package: com.zjq.oauth2
    title: 认证服务API接口文档
# Oauth2
client:
  oauth2:
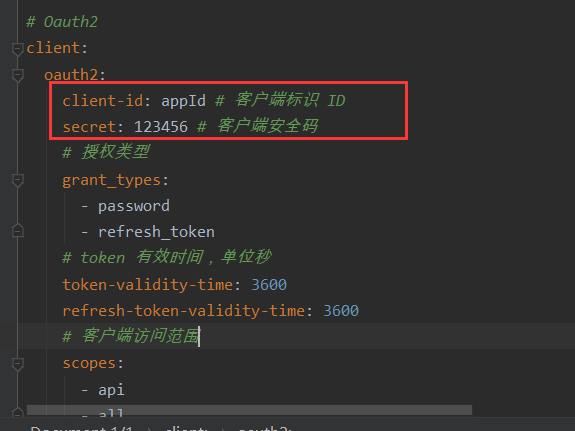
    client-id: appId # 客户端标识 ID
    secret: 123456 # 客户端安全码
    # 授权类型
    grant_types:
      - password
      - refresh_token
    # token 有效时间,单位秒
    token-validity-time: 3600
    refresh-token-validity-time: 3600
    # 客户端访问范围
    scopes:
      - api
      - all
# 配置 Eureka Server 注册中心
eureka:
  instance:
    prefer-ip-address: true
    instance-id: ${spring.cloud.client.ip-address}:${server.port}
  client:
    service-url:
      defaultZone: http://localhost:8080/eureka/
# Mybatis
mybatis:
  configuration:
    map-underscore-to-camel-case: true # 开启驼峰映射
# 指标监控健康检查
management:
  endpoints:
    web:
      exposure:
        include: "*" # 暴露的端点
logging:
  pattern:
    console: '%d{HH:mm:ss} [%thread] %-5level %logger{50} - %msg%n'
pom.xml
        oauth2-demo
        com.zjq
        1.0-SNAPSHOT

    4.0.0
    ms-oauth2-server


            org.springframework.cloud
            spring-cloud-starter-netflix-eureka-client


            org.springframework.boot
            spring-boot-starter-web


            org.springframework.boot
            spring-boot-starter-data-redis


            org.mybatis.spring.boot
            mybatis-spring-boot-starter


            mysql
            mysql-connector-java


            org.springframework.cloud
            spring-cloud-starter-security


            org.springframework.cloud
            spring-cloud-starter-oauth2


            com.zjq
            commons
            1.0-SNAPSHOT


            org.springframework.boot
            spring-boot-configuration-processor
            true
Security配置类
我们开始搭建Spring Security相关的配置类,具体配置类代码如下:
package com.zjq.oauth2.server.config;
import cn.hutool.crypto.digest.DigestUtil;
import org.springframework.context.annotation.Bean;
import org.springframework.context.annotation.Configuration;
import org.springframework.data.redis.connection.RedisConnectionFactory;
import org.springframework.security.authentication.AuthenticationManager;
import org.springframework.security.config.annotation.web.builders.HttpSecurity;
import org.springframework.security.config.annotation.web.configuration.EnableWebSecurity;
import org.springframework.security.config.annotation.web.configuration.WebSecurityConfigurerAdapter;
import org.springframework.security.crypto.password.PasswordEncoder;
import org.springframework.security.oauth2.provider.token.store.redis.RedisTokenStore;
import javax.annotation.Resource;
/**
 * Security 配置类
 * @author zjq
 */
@Configuration
@EnableWebSecurity
public class SecurityConfiguration extends WebSecurityConfigurerAdapter {
    // 注入 Redis 连接工厂
    @Resource
    private RedisConnectionFactory redisConnectionFactory;
    /**
     * 初始化 RedisTokenStore 用于将 token 存储至 Redis
     * @return
     */
    @Bean
    public RedisTokenStore redisTokenStore() {
        RedisTokenStore redisTokenStore = new RedisTokenStore(redisConnectionFactory);
        redisTokenStore.setPrefix("TOKEN:"); // 设置key的层级前缀,方便查询
        return redisTokenStore;
    }
    // 初始化密码编码器,用 MD5 加密密码
    @Bean
    public PasswordEncoder passwordEncoder() {
        return new PasswordEncoder() {
            /**
             * 加密
             * @param rawPassword 原始密码
             * @return
             */
            @Override
            public String encode(CharSequence rawPassword) {
                return DigestUtil.md5Hex(rawPassword.toString());
            }
            /**
             * 校验密码
             * @param rawPassword       原始密码
             * @param encodedPassword   加密密码
             * @return
             */
            @Override
            public boolean matches(CharSequence rawPassword, String encodedPassword) {
                return DigestUtil.md5Hex(rawPassword.toString()).equals(encodedPassword);
            }
        };
    }
    // 初始化认证管理对象
    @Bean
    @Override
    public AuthenticationManager authenticationManagerBean() throws Exception {
        return super.authenticationManagerBean();
    }
    // 放行和认证规则
    @Override
    protected void configure(HttpSecurity http) throws Exception {
        http.csrf().disable()
                .authorizeRequests()
                // 放行的请求
                .antMatchers("/oauth/**", "/actuator/**").permitAll()
                .and()
                .authorizeRequests()
                // 其他请求必须认证才能访问
                .anyRequest().authenticated();
    }
}
Security配置类主要完成以下配置:
- 注入 Redis 连接工厂
- 初始化 RedisTokenStore 用于将 token 存储至 Redis
- 初始化密码编码器,用 MD5 加密密码
- 初始化认证管理对象
- 设置放行和认证规则
授权服务配置类
配置完了security配置类后,我们开始编写授权服务配置类,授权服务配置类需要继承AuthorizationServerConfigurerAdapter并重写对应的方法,tips:idea子类重写父类快捷键是Ctrl+O,重写后的授权服务配置类如下:
package com.zjq.oauth2.server.config;
import com.zjq.commons.model.domain.SignInIdentity;
import com.zjq.oauth2.server.service.UserService;
import org.springframework.context.annotation.Configuration;
import org.springframework.security.authentication.AuthenticationManager;
import org.springframework.security.crypto.password.PasswordEncoder;
import org.springframework.security.oauth2.common.DefaultOAuth2AccessToken;
import org.springframework.security.oauth2.config.annotation.configurers.ClientDetailsServiceConfigurer;
import org.springframework.security.oauth2.config.annotation.web.configuration.AuthorizationServerConfigurerAdapter;
import org.springframework.security.oauth2.config.annotation.web.configuration.EnableAuthorizationServer;
import org.springframework.security.oauth2.config.annotation.web.configurers.AuthorizationServerEndpointsConfigurer;
import org.springframework.security.oauth2.config.annotation.web.configurers.AuthorizationServerSecurityConfigurer;
import org.springframework.security.oauth2.provider.token.store.redis.RedisTokenStore;
import javax.annotation.Resource;
import java.util.LinkedHashMap;
/**
 * 授权服务配置类
 * @author zjq
 */
@Configuration
@EnableAuthorizationServer
public class AuthorizationServerConfiguration extends AuthorizationServerConfigurerAdapter {
    // RedisTokenSore
    @Resource
    private RedisTokenStore redisTokenStore;
    // 认证管理对象
    @Resource
    private AuthenticationManager authenticationManager;
    // 密码编码器
    @Resource
    private PasswordEncoder passwordEncoder;
    // 客户端配置类
    @Resource
    private ClientOAuth2DataConfiguration clientOAuth2DataConfiguration;
    // 登录校验
    @Resource
    private UserService userService;
    /**
     * 配置令牌端点安全约束
     *
     * @param security
     * @throws Exception
     */
    @Override
    public void configure(AuthorizationServerSecurityConfigurer security) throws Exception {
        // 允许访问 token 的公钥,默认 /oauth/token_key 是受保护的
        security.tokenKeyAccess("permitAll()")
                // 允许检查 token 的状态,默认 /oauth/check_token 是受保护的
                .checkTokenAccess("permitAll()");
    }
    /**
     * 客户端配置 - 授权模型
     *
     * @param clients
     * @throws Exception
     */
    @Override
    public void configure(ClientDetailsServiceConfigurer clients) throws Exception {
        clients.inMemory().withClient(clientOAuth2DataConfiguration.getClientId()) // 客户端标识 ID
                .secret(passwordEncoder.encode(clientOAuth2DataConfiguration.getSecret())) // 客户端安全码
                .authorizedGrantTypes(clientOAuth2DataConfiguration.getGrantTypes()) // 授权类型
                .accessTokenValiditySeconds(clientOAuth2DataConfiguration.getTokenValidityTime()) // token 有效期
                .refreshTokenValiditySeconds(clientOAuth2DataConfiguration.getRefreshTokenValidityTime()) // 刷新 token 的有效期
                .scopes(clientOAuth2DataConfiguration.getScopes()); // 客户端访问范围
    }
    /**
     * 配置授权以及令牌的访问端点和令牌服务
     *
     * @param endpoints
     * @throws Exception
     */
    @Override
    public void configure(AuthorizationServerEndpointsConfigurer endpoints) throws Exception {
        // 认证器
        endpoints.authenticationManager(authenticationManager)
                // 具体登录的方法
                .userDetailsService(userService)
                // token 存储的方式:Redis
                .tokenStore(redisTokenStore);
    }
}
上面用到的客户端配置类如下:
package com.zjq.oauth2.server.config;
import lombok.Data;
import org.springframework.boot.context.properties.ConfigurationProperties;
import org.springframework.stereotype.Component;
/**
 * 客户端配置类
 * @author zjq
 */
@Component
@ConfigurationProperties(prefix = "client.oauth2")
@Data
public class ClientOAuth2DataConfiguration {
    // 客户端标识 ID
    private String clientId;
    // 客户端安全码
    private String secret;
    // 授权类型
    private String[] grantTypes;
    // token有效期
    private int tokenValidityTime;
    /**
     * refresh-token有效期
     */
    private int refreshTokenValidityTime;
    /**
     * 客户端访问范围
     */
    private String[] scopes;
}
具体登录的方法实现:
登录实现
package com.zjq.oauth2.server.service;
import com.zjq.commons.model.domain.SignInIdentity;
import com.zjq.commons.model.pojo.Users;
import com.zjq.commons.utils.AssertUtil;
import com.zjq.oauth2.server.mapper.UsersMapper;
import org.springframework.beans.BeanUtils;
import org.springframework.security.core.userdetails.UserDetails;
import org.springframework.security.core.userdetails.UserDetailsService;
import org.springframework.security.core.userdetails.UsernameNotFoundException;
import org.springframework.stereotype.Service;
import javax.annotation.Resource;
/**
 * 登录校验
 * @author zjq
 */
@Service
public class UserService implements UserDetailsService {
    @Resource
    private UsersMapper usersMapper;
    @Override
    public UserDetails loadUserByUsername(String username) throws UsernameNotFoundException {
        AssertUtil.isNotEmpty(username, "请输入用户名");
        Users users = usersMapper.selectByAccountInfo(username);
        if (users == null) {
            throw new UsernameNotFoundException("用户名或密码错误,请重新输入");
        }
        // 初始化登录认证对象
        SignInIdentity signInIdentity = new SignInIdentity();
        // 拷贝属性
        BeanUtils.copyProperties(users, signInIdentity);
        return signInIdentity;
    }
}
UsersMapper:
package com.zjq.oauth2.server.mapper;
import com.zjq.commons.model.pojo.Users;
import org.apache.ibatis.annotations.Param;
import org.apache.ibatis.annotations.Select;
/**
 * 用户 Mapper
 * @author zjq
 */
public interface UsersMapper {
    /**
     *
     * 根据用户名 or 手机号 or 邮箱查询用户信息
     *
     * @param account
     * @return
     */
    @Select("select id, username, nickname, phone, email, " +
            "password, avatar_url, roles, is_valid from t_users where " +
            "(username = #{account} or phone = #{account} or email = #{account})")
    Users selectByAccountInfo(@Param("account") String account);
}
用户实体:
package com.zjq.commons.model.pojo;
import com.zjq.commons.model.base.BaseModel;
import lombok.Getter;
import lombok.Setter;
/**
 * 用户实体类
 *
 * @Author zjq
 * @Date 2022/10/12
 */
@Getter
@Setter
public class Users extends BaseModel {
    // 主键
    private Integer id;
    // 用户名
    private String username;
    // 昵称
    private String nickname;
    // 密码
    private String password;
    // 手机号
    private String phone;
    // 邮箱
    private String email;
    // 头像
    private String avatarUrl;
    // 角色
    private String roles;
}
package com.zjq.commons.model.base; import lombok.Getter; import lombok.Setter; import java.io.Serializable; import java.util.Date; /** * 实体对象公共属性 * * @Author zjq * @Date 2022/10/12 */ @Getter @Setter public class BaseModel implements Serializable { private Integer id; private Date createDate; private Date updateDate; private int isValid; }到此,我们完成了认证授权服务构建,接下来我们进行测试验证:
测试验证
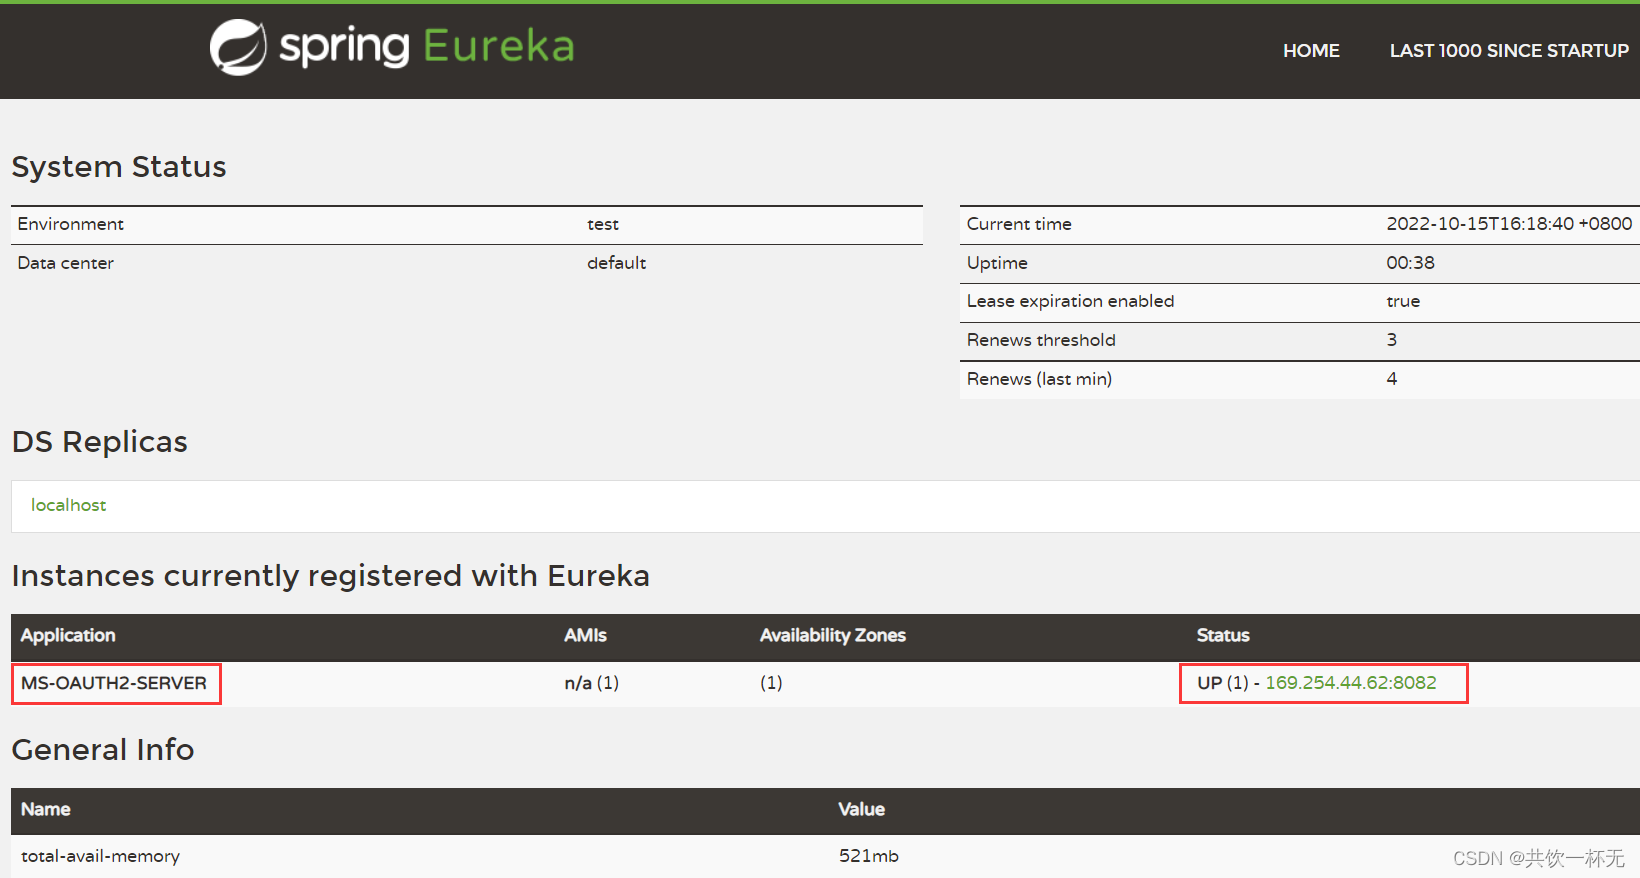
我们启动注册中心和认证授权微服务。访问注册中心:http://localhost:8080/
可以看到认证授权服务已经注册到注册中心。
接下来我们通过postman访问请求token测试:
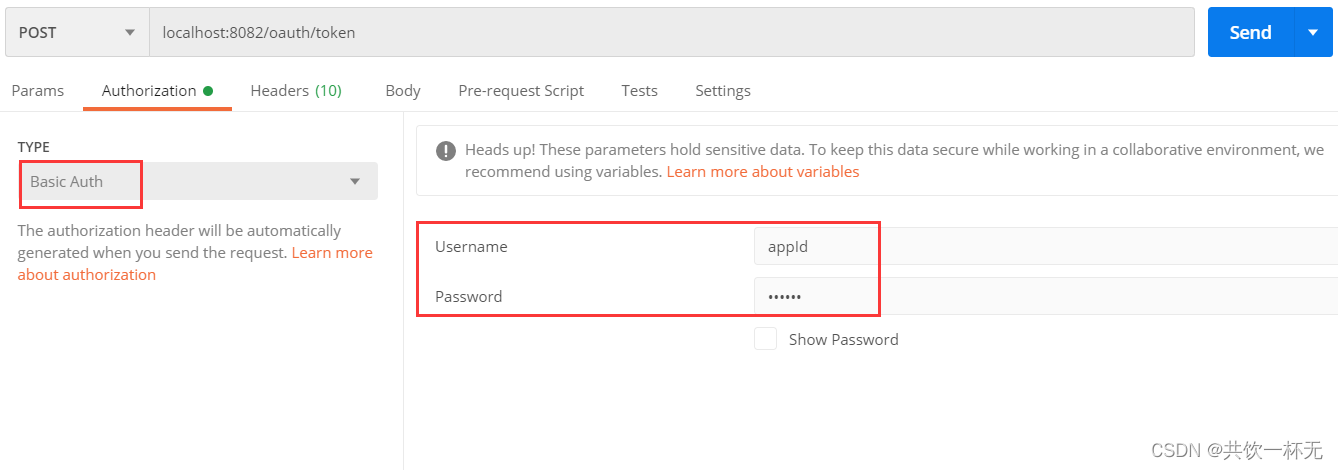
Authorization请求头中配置,username和password,对应oauth客户端中的配置:
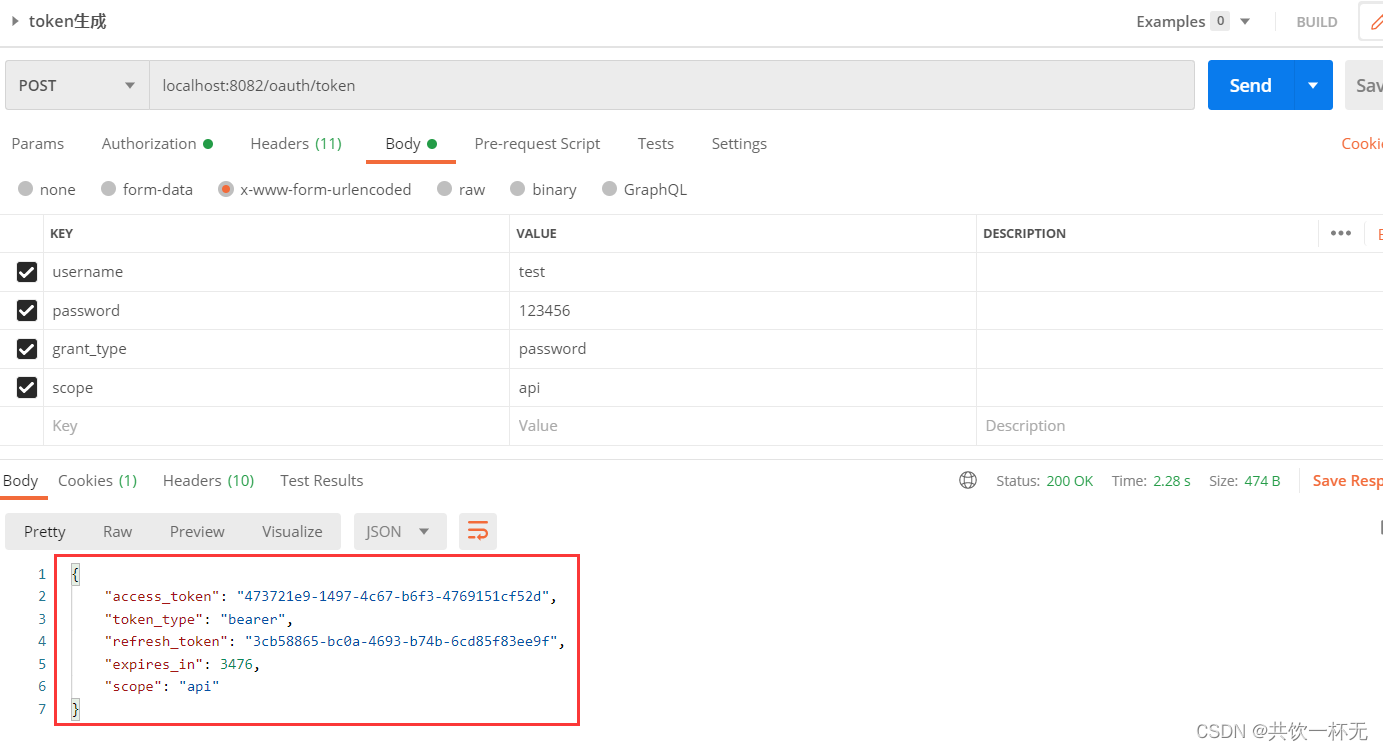
在body中配置请求参数,发起请求后返回如下:
在Redis中我们也可以看到生成的相关token配置:
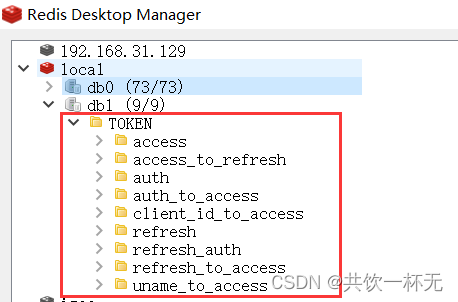
至此,我们完成了认证授权中心的初步搭建。
本文内容到此结束了,
如有收获欢迎点赞👍收藏💖关注✔️,您的鼓励是我最大的动力。
如有错误❌疑问💬欢迎各位指出。
主页:共饮一杯无的博客汇总👨💻
保持热爱,奔赴下一场山海。🏃🏃🏃


