- Node.js脚手架安装配置、Vue环境搭建以及创建Vue项目 (包括
- MySQL:使用“IN“语句查询时保持顺序
- 群晖折腾记1—群晖NAS使用docker中的ddns-go,DDNS阿
- Spring Boot动态设置定时任务
- 《项目实战》构建SpringCloud alibaba项目(二、构建微
- 【MySQL】MySQL基本语句大全
- Springboot集成kafka(环境搭建+演示)|超级详细,建议收
- java.sql.SQLException: No value spe
- Nginx出现403错误,应该怎么解决
- redisson配置类---SpringBoot集成、redis单机和
- 【Java面试篇】Spring中@Transactional注解事务失
- 【绿色版】Mysql下载、安装、配置与使用(保姆级教程)
- 详解PHP获取域名的各种方法
- MySQL课程设计——简易学生信息管理系统
- Spring之国际化:i18n
- MySQL——源码安装教程
- SpringBoot之@ConditionalOnProperty注解
- 总结Nginx的安装、配置与设置开机自启
- Mysql - 日志
- 如何通过navicat连接SQL Server数据库
- 整合SpringSecurity
- mysql-SQL从一个表查询数据插入更新到另一个表
- Springboot自定义ThreadPoolTaskExecutor
- zookeeper安装和启动
- SQL Server存储过程(数据库引擎)使用详解
- Springboot——文件的上传与下载(reggie)
- SpringGateway网关
- SSM框架详细讲解
- MySQL中的行级锁
- 同一台服务器安装多个nginx(总结)
文章目录
- SpringBoot 整合knife4j
- 引入knife4j
- 注解
- 案例
- knife4j增强功能
- 接口添加作者
- 资源屏蔽
- 访问页面加权控制
- 接口排序
- 分组排序
- 请求参数缓存
- 过滤请求参数
- 禁用调试
- 禁用搜索框
SpringBoot 整合knife4j
Knife4j是一款基于Swagger 2的在线API文档框架
在Spring Boot中,使用此框架时,需要:
- 添加依赖
- 在配置文件(`application.properties`)中开启增强模式
- 编写配置类(代码相对固定,建议CV)
引入knife4j
添加依赖
    com.github.xiaoymin
    knife4j-spring-boot-starter
    3.0.3
创建 Swagger 配置依赖
package com.yolo.knife4j.config;
import io.swagger.annotations.Api;
import lombok.extern.slf4j.Slf4j;
import org.springframework.beans.factory.annotation.Value;
import org.springframework.context.annotation.Bean;
import org.springframework.context.annotation.Configuration;
import org.springframework.context.annotation.Import;
import springfox.bean.validators.configuration.BeanValidatorPluginsConfiguration;
import springfox.documentation.builders.*;
import springfox.documentation.service.*;
import springfox.documentation.spi.DocumentationType;
import springfox.documentation.spring.web.plugins.Docket;
import springfox.documentation.swagger2.annotations.EnableSwagger2WebMvc;
@Slf4j
@Configuration
@EnableSwagger2WebMvc
// 对JSR303提供支持
@Import(BeanValidatorPluginsConfiguration.class)
public class Knife4jConfig {
    @Value("${spring.application.name}")
    private String applicationName;
    @Bean
    public Docket defaultApi() {
        return new Docket(DocumentationType.SWAGGER_2)
                .apiInfo(apiInfo())
                .groupName(applicationName)
                .select()
                // 添加@Api注解才显示
                .apis(RequestHandlerSelectors.withClassAnnotation(Api.class))
                // 这里指定Controller扫描包路径
//                .apis(RequestHandlerSelectors.basePackage("com.yolo"))
                .paths(PathSelectors.any())
                .build();
    }
    /**
     * swagger-api接口描述信息
     */
    private ApiInfo apiInfo() {
        return new ApiInfoBuilder()
                .title("API文档")
                .description("API文档")
                .contact(
                        new Contact(
                                "yolo",
                                "https://gitee.com/huanglei1111",
                                "2936412130@qq.com"
                        )
                )
                .version("1.0.0")
                .build();
    }
}
application.yml配置文件
# https://doc.xiaominfo.com/knife4j
knife4j:
  # 开启增强配置
  enable: true
  # 是否开启生产环境屏蔽   true:关闭swagger,false:开启swagger
  production: false
  basic:
    # 是否开启认证
    enable: false
    # Basic认证用户名
    username: admin
    # Basic认证密码
    password: 123456
spring:
  application:
    name: test-knife4j
注解
@Api(tags = {“用户操作”})
加在controller类上
tags表示该类的标签,在页面会独立显示一个菜单

@ApiOperation(value = “保存用户”, notes = “保存时,ID由数据库生成,无需填写,有则忽略”, tags = “保存”)
加在相应的请求处理方法上
value表示该方法的说明
notes相当于对该方法的详细说明,也就是更加完整的描述
tags 表示标签,,在页面会独立显示一个菜单

@ApiImplicitParam(name = “id”, value = “用户ID”, defaultValue = “1”)
方法只有一个基本类型参数时加在方法上。方法有多个参数时加在@ApiImplicitParams内
name 参数中属性的名字
value 对这个属性的描述
defaultValue 默认值,这个还是有必要填写的,在页面进行请求时,会自动填充

@ApiImplicitParams(value = {})
用在请求方法上
这个注解必须和@ApiImplicitParam配合使用
当请求方法中的请求参数很多的时候,例如saveUser(String username, Integer age, Date birthday, String phone)

@ApiParam(value = “当前页”, defaultValue = “1”)
加在请求方法的普通参数上
value的值是对该参数的说明
与@ApiImplicitParam使用的效果等同,根据个人喜好进行使用

@ApiModel(value = “用户信息”)
加在请求方法的对象类上
value 对该对象参数的描述
例如有一个请求方法save(UserDTO userDTO), 则需要加在UserDTO这个类上面(可以参照下面的示例)

@ApiModelProperty(value = “用户ID”, example = “1”)
加在请求方法的参数对象的属性上
value 对该属性的描述
example 属性的示例值,在页面会自动填充该值


@ApiIgnore:注解类、参数、方法,注解后将不在Swagger UI中显示
案例
package com.yolo.knife4j.controller; import cn.hutool.core.collection.ListUtil; import com.yolo.knife4j.base.ResultVo; import com.yolo.knife4j.dto.UserAddRequest; import com.yolo.knife4j.vo.StudentVO; import com.yolo.knife4j.vo.UserVO; import io.swagger.annotations.*; import org.springframework.web.bind.annotation.*; import javax.validation.Valid; import java.util.Date; @ApiResponses(value = { @ApiResponse(code = 200, message = "接口返回成功状态"), @ApiResponse(code = 500, message = "接口返回未知错误,请联系开发人员调试") }) @Api(tags = "用户") @RestController @RequestMapping("/user") public class UserController { @ApiOperation(value = "保存用户", notes = "简单传参") @PostMapping("/add") public ResultVo响应参数
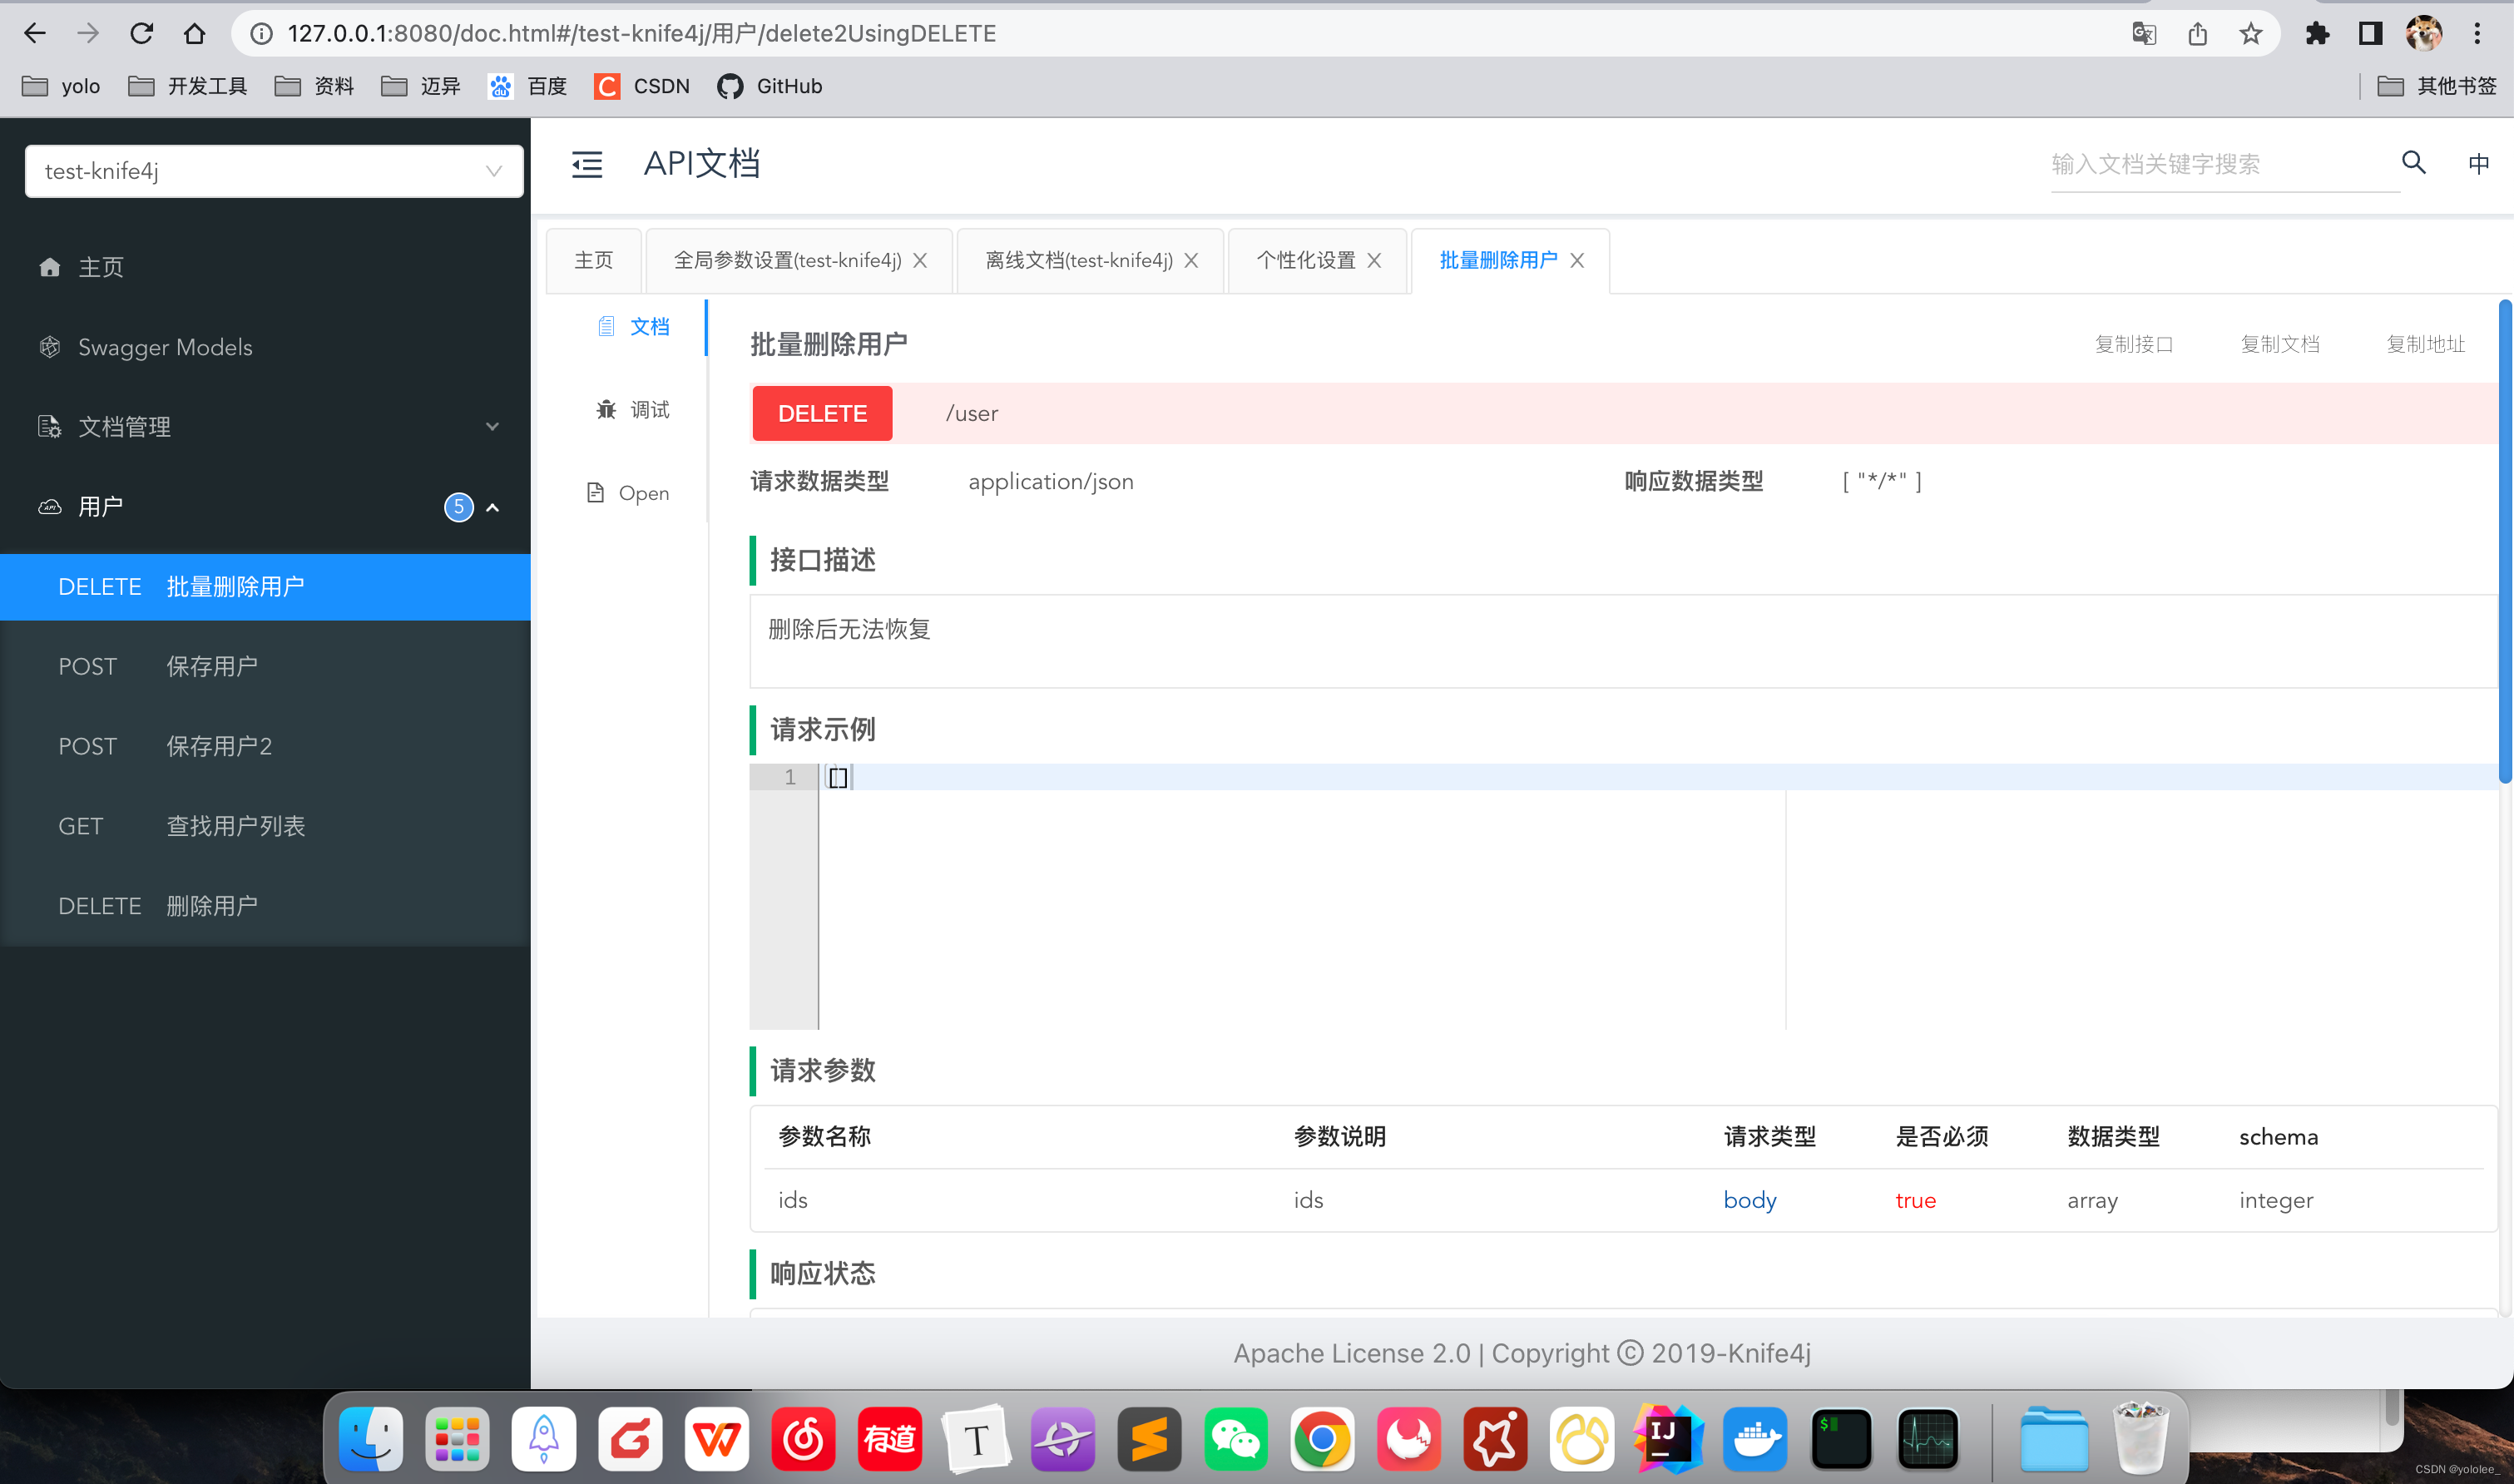
package com.yolo.knife4j.base; import com.fasterxml.jackson.annotation.JsonFormat; import io.swagger.annotations.ApiModel; import io.swagger.annotations.ApiModelProperty; import lombok.AllArgsConstructor; import lombok.Builder; import lombok.Data; import lombok.NoArgsConstructor; import lombok.experimental.Accessors; import java.io.Serializable; import java.util.Date; @Data @Builder @Accessors(chain = true) @ApiModel("响应参数") @AllArgsConstructor @NoArgsConstructor public class ResultVoimplements Serializable { private static final long serialVersionUID = -8054007511410819665L; @ApiModelProperty(value = "响应状态码", example = "1", dataType = "Integer") private int code; // 是否成功标识.true表示成功,false表示失败 @ApiModelProperty("success标识,true表示成功,false表示失败") private boolean success; // 操作成功时需要响应给客户端的响应数据 @ApiModelProperty("响应信息") private String msg; @ApiModelProperty("响应数据") private T data; @ApiModelProperty("当前时间") @JsonFormat(pattern = "yyyy-MM-dd HH:mm:ss", timezone = "GMT+8") private Date time; } tips: http://127.0.0.1:8080/doc.html
这里端口,就是你运行项目的端口
knife4j增强功能
springboot 中 knife4j的完整参数如下:
knife4j:
  enable: true
  documents:
    -
      group: 2.X版本
      name: 接口签名
      locations: classpath:sign/*
  setting:
    language: zh-CN
    enableSwaggerModels: true
    enableDocumentManage: true
    swaggerModelName: 实体类列表
    enableVersion: false
    enableReloadCacheParameter: false
    enableAfterScript: true
    enableFilterMultipartApiMethodType: POST
    enableFilterMultipartApis: false
    enableRequestCache: true
    enableHost: false
    enableHostText: 192.168.0.193:8000
    enableHomeCustom: true
    homeCustomLocation: classpath:markdown/home.md
    enableSearch: false
    enableFooter: false
    enableFooterCustom: true
    footerCustomContent: Apache License 2.0 | Copyright  2019-[浙江八一菜刀股份有限公司](https://gitee.com/xiaoym/knife4j)
    enableDynamicParameter: false
    enableDebug: true
    enableOpenApi: false
    enableGroup: true
  cors: false
  production: false
  basic:
    enable: false
    username: test
    password: 12313
接口添加作者
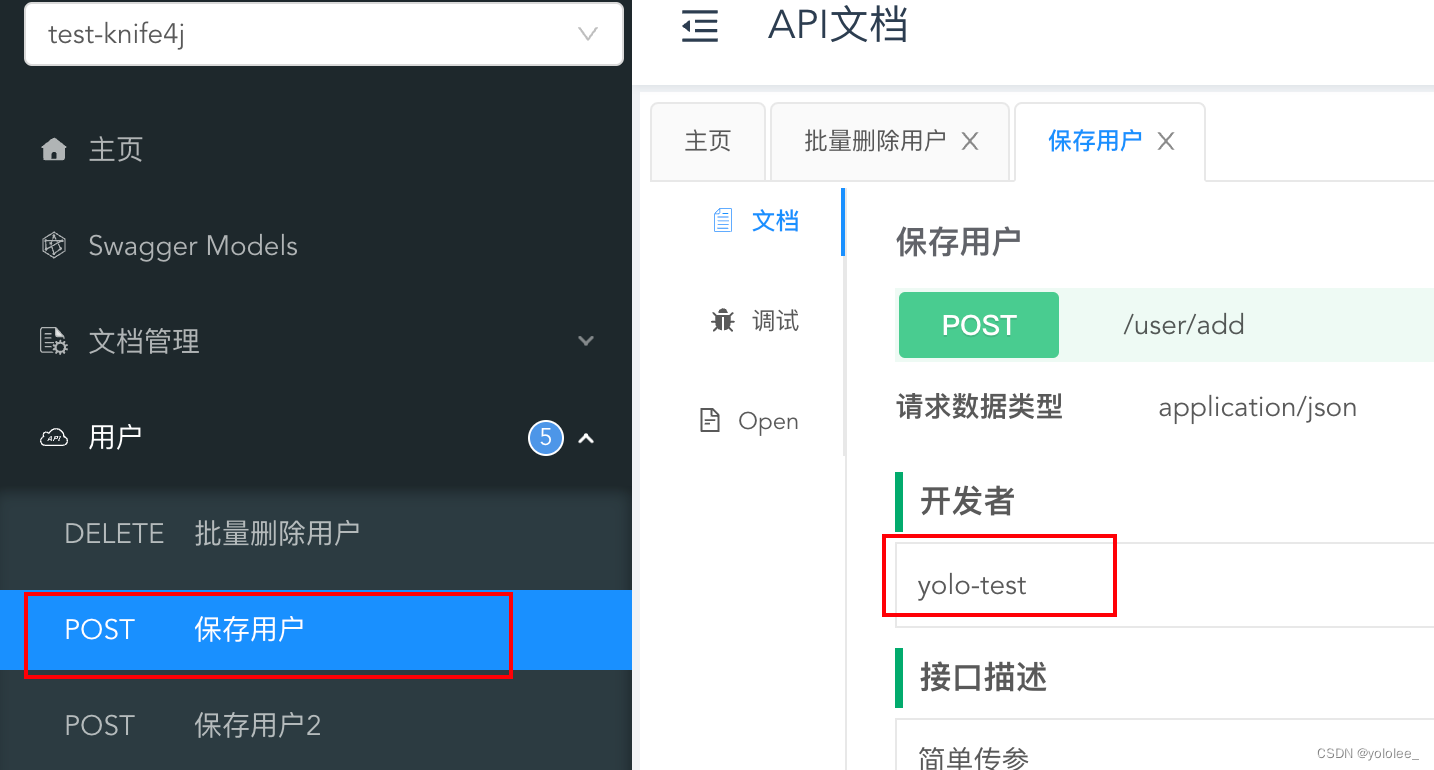
添加作者有俩种方式
- 在方法上使用注解 @ApiOperationSupport(author = "yolo-test")
- 在controller类上使用注解 @ApiSupport(author = "yolo-controller")
如果在方法上使用了注解,并且也在类上使用了注解,那么最后的展示结果以方法上的注解为准
资源屏蔽
当我们在生成环境的时候不想显示接口文档,由于 Knife4j 基于 Servlet 体系提供了过滤 Filter 功能,所以就不需要我们再去造轮子了,直接使用即可
knife4j:
  # 开启增强配置
  enable: true
  # 是否开启生产环境屏蔽   true:关闭swagger,false:开启swagger
  production: true
然后重启项目

访问页面加权控制
针对Swagger的资源接口,Knife4j提供了简单的Basic认证功能
简单点说,指定一个用户名和密码,访问 Swagger 文档需要验证登录名和密码,验证通过之后才能正常访问
如果用户开启了 basic (knife4j.basic.enable = true)认证功能,但是没有指定 username 和password,那么 knife4j 提供了一组默认的用户名密码
admin/123321
knife4j:
  # 开启增强配置
  enable: true
  # 是否开启生产环境屏蔽   true:关闭swagger,false:开启swagger
  production: false
  basic:
    # 是否开启认证
    enable: true
    # Basic认证用户名
    username: admin
    # Basic认证密码
    password: 123456
如果开启生产环境屏蔽了,开启basic认证是不生效的

接口排序
@ApiOperationSupport注解中增加了 order 字段,用于接口排序。在使用此注解之前需要开启增强功能
分组排序
分组,顾名思义,就是多个 controller 之间的排序,开发者可以通过注解实现每个controller 之间的排序,实现这个功能的注解一共有三个,具体如下
@ApiSupport
@RestController
@RequestMapping(value = "/test")
@ApiSupport(author = "yolo-controller",order = 999)
@Api(tags = "测试swagger")
public class Knife4jTestController
@ApiSort
@RestController
@RequestMapping(value = "/test")
@ApiSort(value = 999)
@Api(tags = "测试swagger")
public class Knife4jTestController
@Api
@RestController
@RequestMapping(value = "/test")
@Api(tags = "测试swagger",position = 999)
public class Knife4jTestController
Tips:
这三个注解是存在优先级的,也就是说,当同时使用时,只会有一个注解生效,所以在使用的时候需要特别注意。优先级规则如下
@ApiSupport > @ApiSort>@Api
请求参数缓存
我们在调试接口的时候,有的接口会有很多参数,当我们好不容易填好了所有的参数,由于我们不小心关闭了页面,下次再调试的时候发现还需要再次将参数输入一遍,心态会爆炸吧,所以 knife4j 在文档管理中增加了一个选项:开启请求参数缓存

Tips:
俩种情况会失效
1、 @ApiModelProperty 注解中添加 example (属性的示例值)属性,那么, knife4j 将不会使用缓存,使用的是后端指定的 example
2、当域名发生改变时,所有缓存将会失效
过滤请求参数
我们在开发过程中,经常会遇到这样的一个问题,新增和修改接口,修改接口需要传递修改的记录id,但是新增则不需要,而后端往往会将修改和新增的入参对象设置为一个对象,那么这个对象中必然会存在 id 字段,这就会对新增造成误导
所以,knife4j 支持了请求参数的过滤(忽略),实现方式也是非常的简单,使用自定义增强注解ApiOperationSupport中的ignoreParameters属性,可以强制忽略要显示的参数
这里表单和json格式过滤参数是不一样的
我们先看表单格式
@ApiModel("用户信息")
@Getter
@Setter
@ToString
public class UserDTO {
    @ApiModelProperty(value = "用户id")
    private Long id;
    @ApiModelProperty(value = "用户名",example = "李雷")
    private String username;
    @ApiModelProperty(value = "性别",example = "男")
    private String gender;
    @ApiModelProperty(value = "手机号码",example = "18888888888")
    private String phone;
    @ApiModelProperty(value = "用户收货地址信息")
    private UserAddressDTO userAddressDTO;
}
@Getter
@Setter
@ToString
public class UserAddressDTO {
    @ApiModelProperty(value = "收获地址的记录id")
    private Long id;

    @ApiModelProperty(value = "省")
    private String province;
    @ApiModelProperty(value = "市")
    private String city;
    @ApiModelProperty(value = "区")
    private String district;
    @ApiModelProperty(value = "详细地址")
    private String addr;
}
    @PostMapping(value = "/saveUser")
    @ApiOperation("新增用户信息-表单")
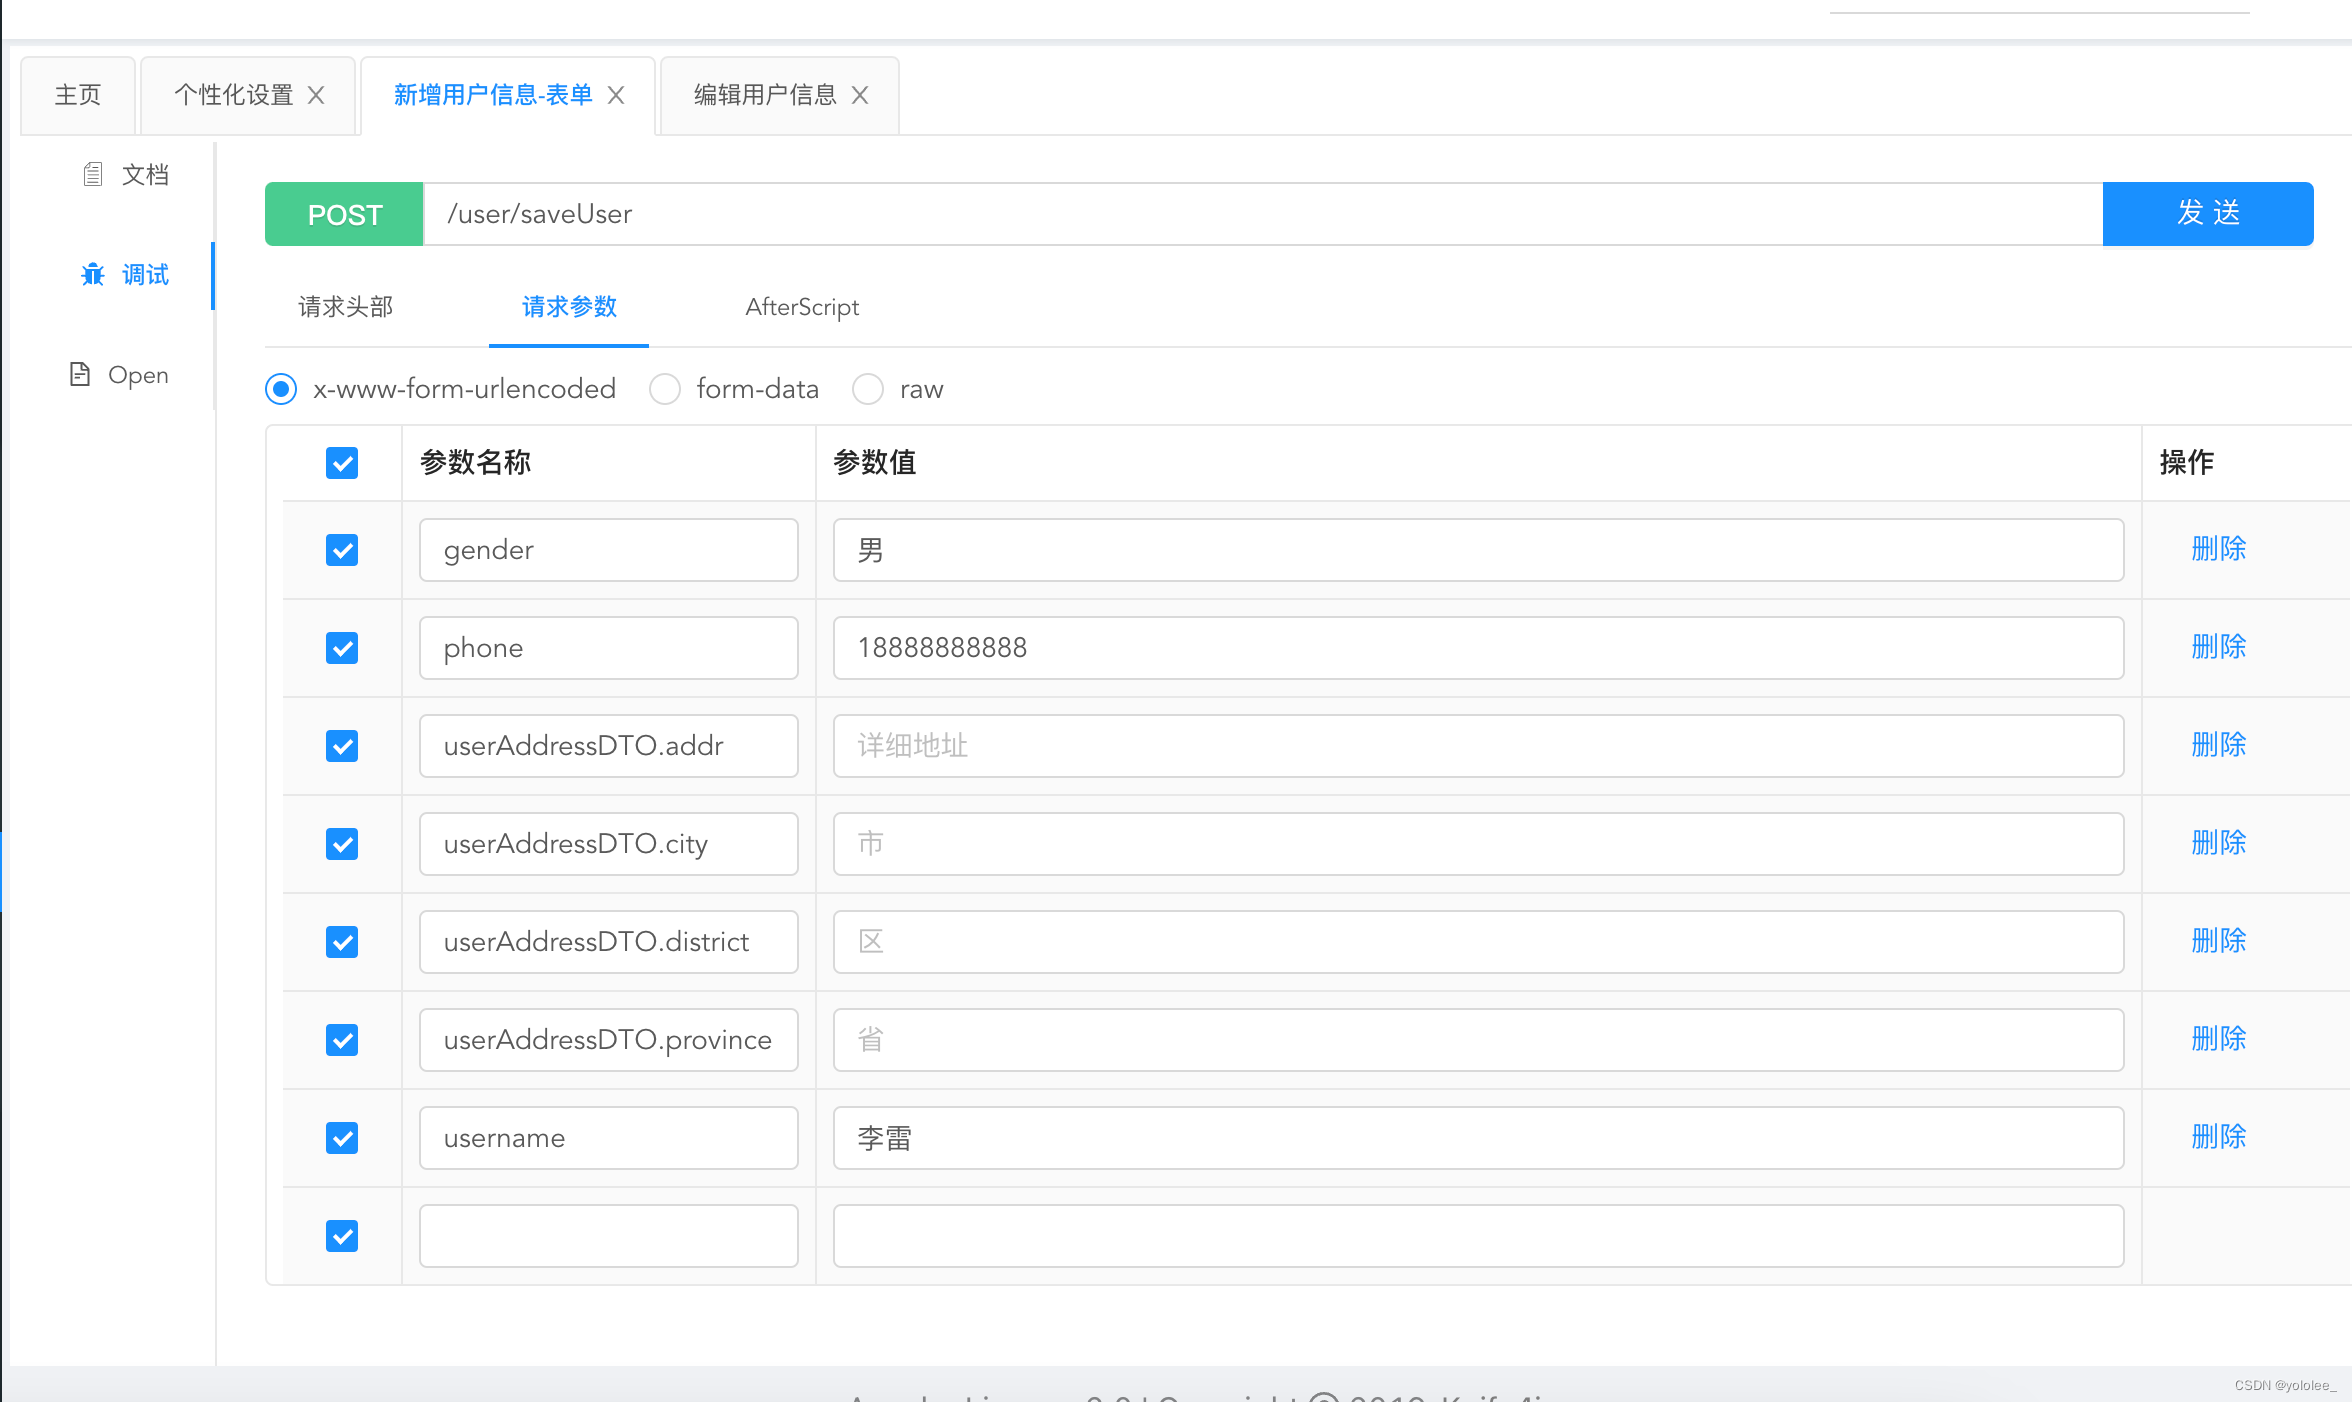
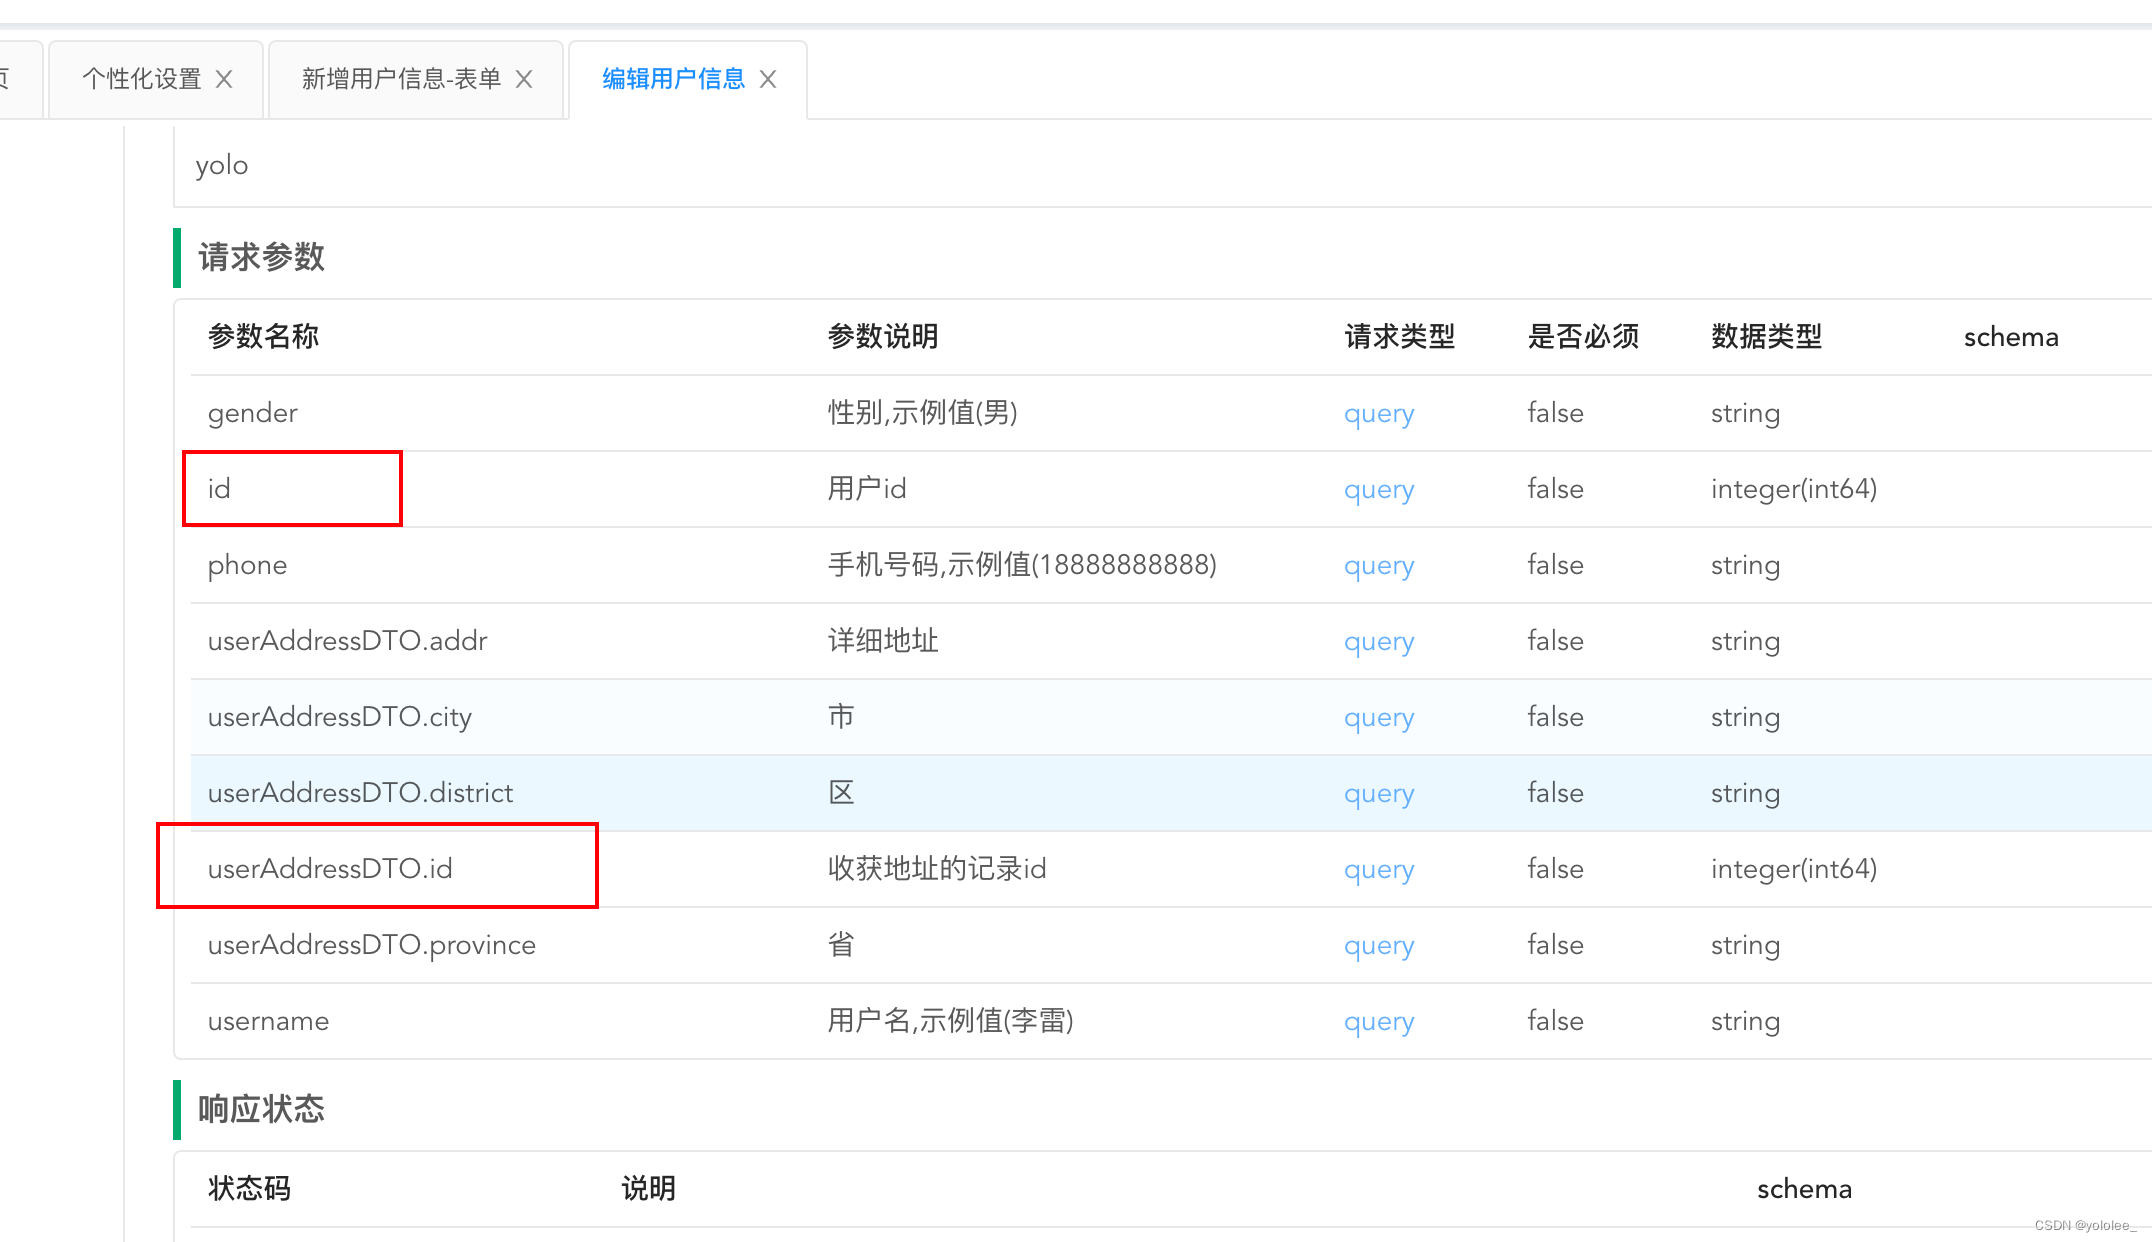
    @ApiOperationSupport(author = "yolo",ignoreParameters = {"id","userAddressDTO.id"})
    public String saveUser(UserDTO userDTO){
        System.out.println("前端传递的用户信息:"+ userDTO);
        return "save success";
    }
    @PostMapping(value = "/updateUser")
    @ApiOperation("编辑用户信息")
    @ApiOperationSupport(author = "yolo")
    public String updateUser( UserDTO userDTO){
        System.out.println("前端传递的用户信息:"+ userDTO);
        return "edit success";
    }
在过滤字段的时候,第一层我们只要填写对象中的属性名即可,但如果需要过滤第二层,根据忽略规则中的第二条,我们在 UserDTO 对象中引入 UserAddressDTO 对象:private UserAddressDTO userAddressDTO; 我们还需要忽略 UserAddressDTO 对象中的 id 属性,那么需要填上 userAddressDTO.id ,其中 userAddressDTO 要与 UserDTO 对象中的 UserAddressDTO 属性名一致
新增操作没有id
编辑操作
JSON格式忽略
专业说法是:实例名.属性名,以新增用户为例,我们需要过滤用户id,那么写法就是:userDTO.id,其中 userDTO 为 saveUser() 的 参数名
    @PostMapping(value = "/saveUser")
    @ApiOperation("新增用户信息")
    @ApiOperationSupport(author = "yolo",ignoreParameters = {"userDTO.id","userDTO.userAddressDTO.id"})
    public String saveUser(@RequestBody UserDTO userDTO){
        System.out.println("前端传递的用户信息:"+ userDTO);
        return "save success";
    }
禁用调试
knife4j:
  enable: true
  setting:
    enableDebug: false
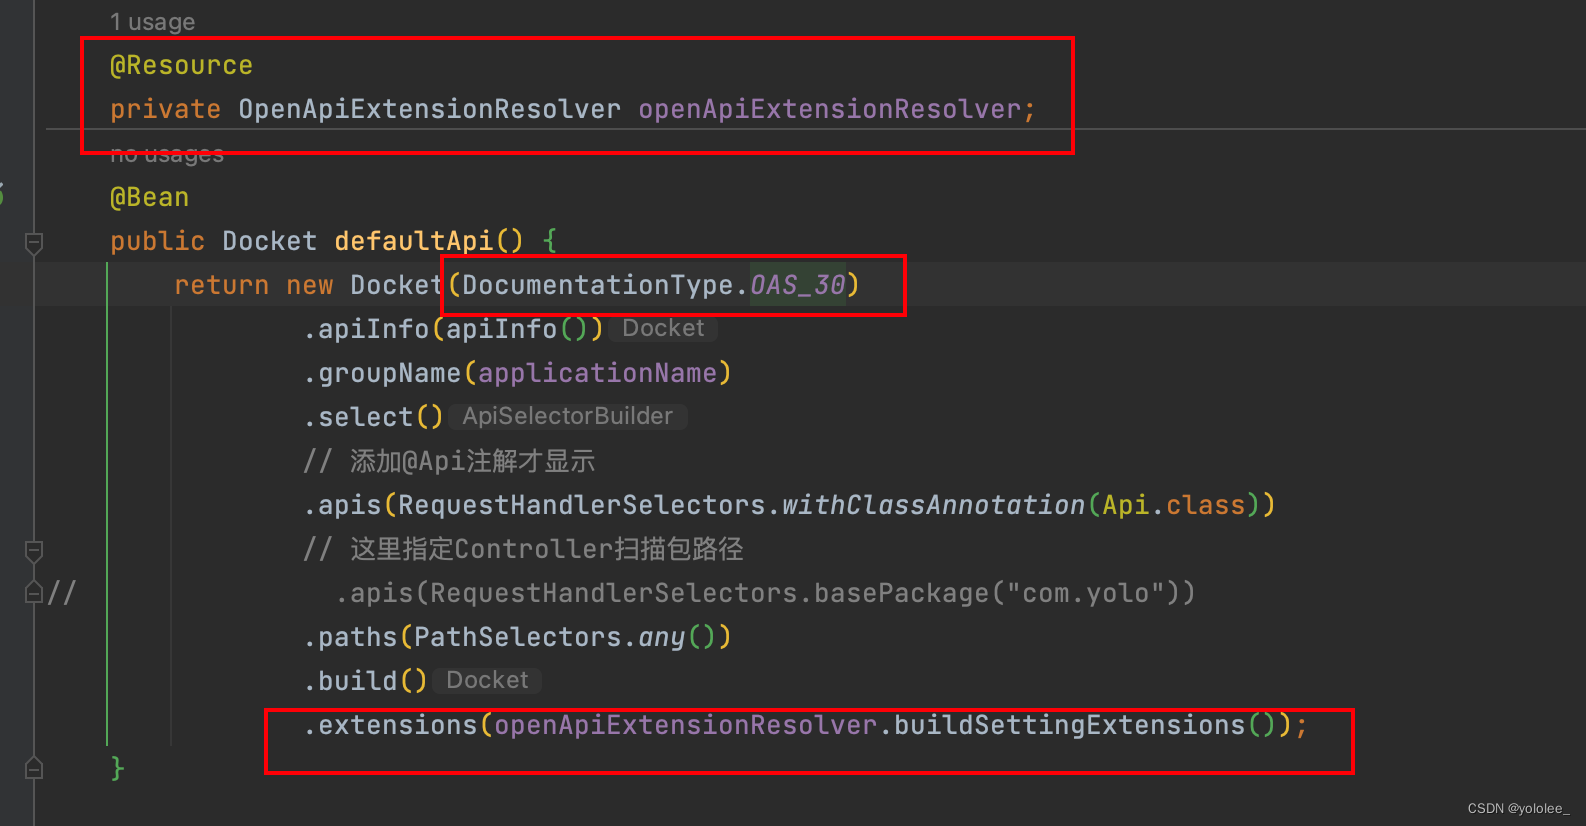
enableDebug:该属性是一个Boolean值,代表是否启用调试功能,默认值为true(代表开启调试),如果要禁用调试,该值设为false
同样,此操作也需要开发者在创建Docket逻辑分组对象时,通过Knife4j提供的工具对象OpenApiExtensionResolver将扩展属性进行赋值
禁用搜索框
发者如果想要禁用Ui界面中的搜索功能,需要通过增强属性进行配置,此功能需要开启增强功能
knife4j:
  enable: true
  setting:
    enableSearch: false
enableSearch:该属性是一个Boolean值,代表是否启用搜索功能,默认值为true(代表开启搜索),如果要禁用搜索,该值设为false
同样,此操作也需要开发者在创建Docket逻辑分组对象时,通过Knife4j提供的工具对象OpenApiExtensionResolver将扩展属性进行赋值。具体的代码实现请参考禁用调试和自定义主页内容,我这里就不重复了。
上一篇:数据库课程设计


