- SQL Server存储过程(数据库引擎)使用详解
- Java+Swing+MySQL实现学生选课管理系统
- Docker的配置和部署,并搭建php和nginx环境
- PHP小区物业管理系统的设计与实现 毕业设计-附源码99201
- 在 VSCode 中配置 PHP 开发环境
- Access denied for user ‘‘@‘localhos
- 网上商城购物系统设计与实现(Java+Web+SSM+MySQL)
- Springboot获取jar包中resources资源目录下的文件
- 一文带你了解MySQL之连接原理
- 同一台服务器安装多个nginx(总结)
- 实现【Linux--NTP 时间同步服务搭建】
- nginx常见漏洞解析
- 使用Node.js进行应用程序的打包和部署
- 深入了解Spring Boot中@Async注解的8大坑点
- SpringCloud微服务实战——搭建企业级开发框架:第三方登录-微
- [Python+Django]Web学生信息管理系统数据库设计及系统实
- (解析+源码)基于JAVA Swing+MySQL实现学生信息管理系统
- 使用 Ubuntu 安装最新版本的 Node.js
- mac卸载mysql教程(按照步骤可完全卸载)
- Mysql时间戳(随笔)
- Linux 部署 Nginx
- Spring Boot Security认证:Redis缓存用户信息
- 【Python】猎聘网招聘数据爬虫(Python网络爬虫课设简要)
- windows安装npm(Node.js)教程
- mysql5.7安装和配置教程(图文讲解超详细)
- Azure Machine Learning - Azure Open
- Android 获取网络连接状态新方法
- RabbitMQ清除积压消息管理界面出现 Unacked 消息
- 第2章 IMS架构、网元、接口
- Spring Boot 集成 EasyExcel 3.x 优雅实现Ex
Centos7 源码编译安装 Postgresql
- 一、源码安装
- 1.1 下载并解压安装包
- 1.2 安装依赖包
- 1.3 预编译
- 1.4 进行编译安装
- 1.5 创建用户及用户组
- 1.6 创建目录及授权
- 1.7 设置相关环境变量
- 1.8 初始化数据库
- 1.9 启动和关闭数据库
- 1.10 查看数据库后台进程
- 1.11 验证和登陆数据库
- 二、修改数据库相关配置
- 2.1 配置postgresql.conf
- 2.2 配置pg_hba.conf
- 三、Postgresql注册服务
- 3.1 配置服务脚本
- 3.2 验证是否成功注册服务
- 四、修改相关密码
- 4.1 修改用户postgres的密码
- 4.2 修改linux系统postgres用户的密码
一、源码安装
1.1 下载并解压安装包
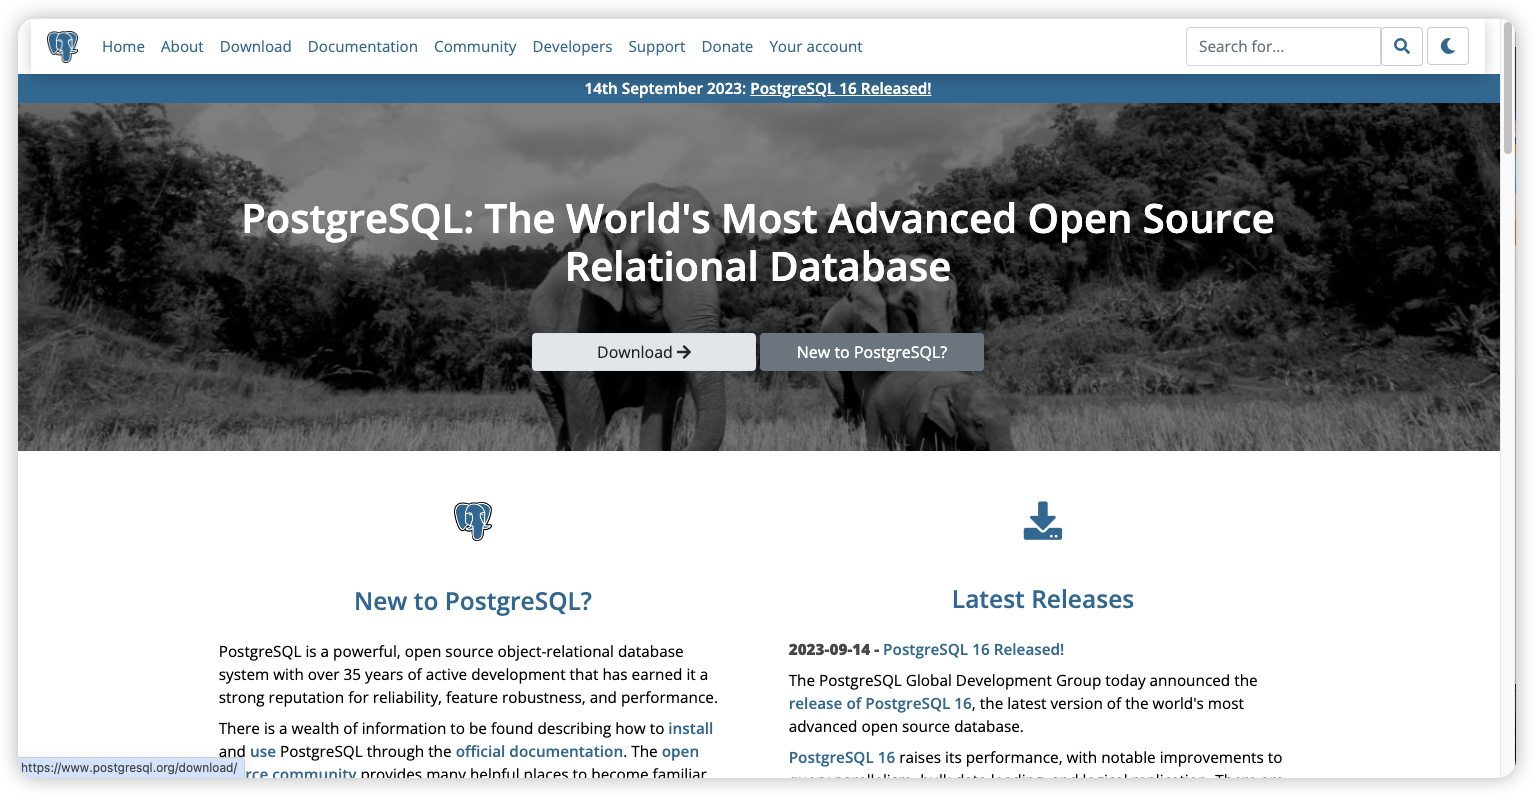
第一步:首先访问Postgresql数据库官网地址
PostgreSQL
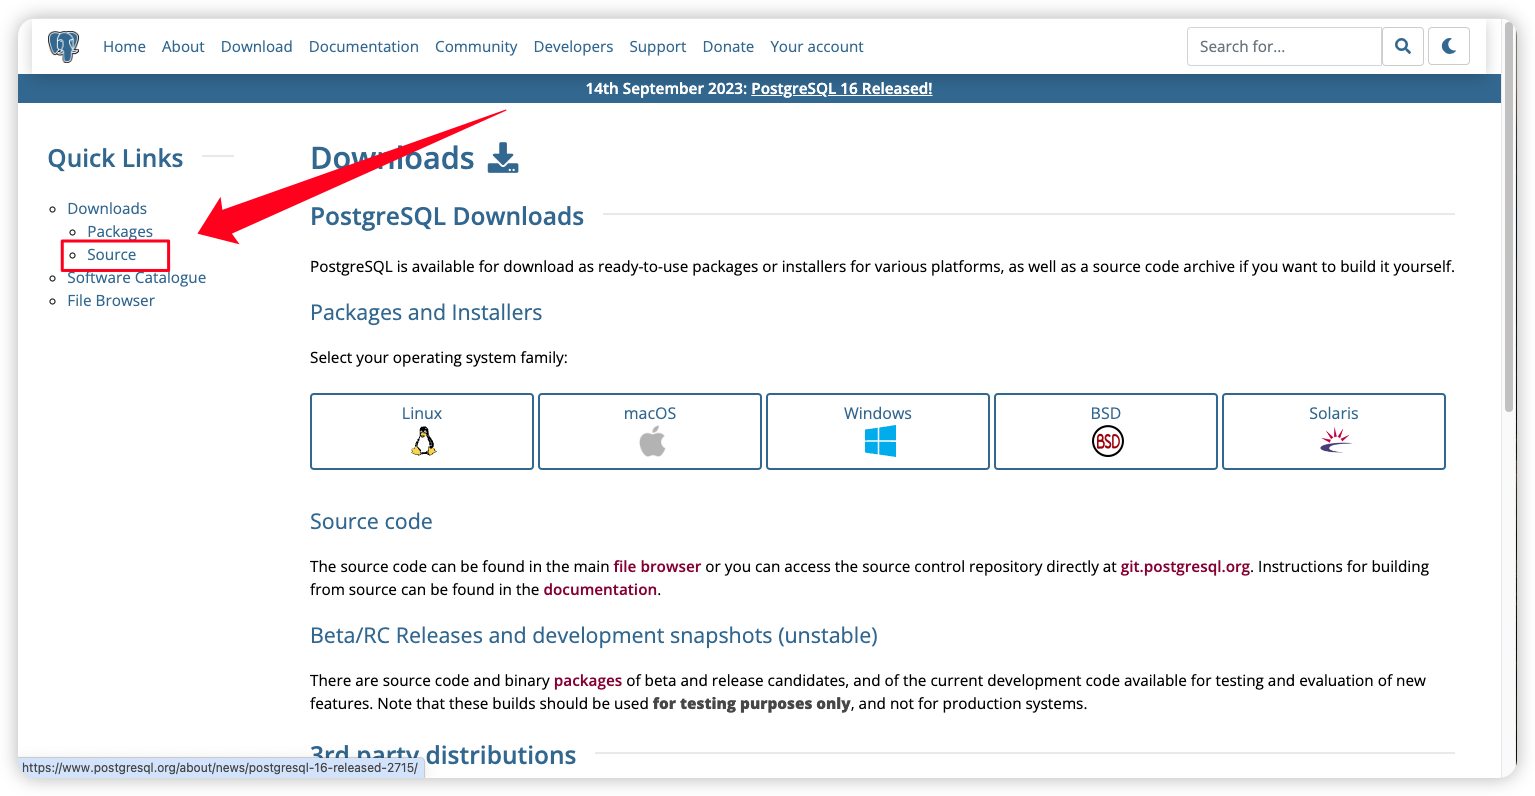
第二步:点击Download进入下载页面。

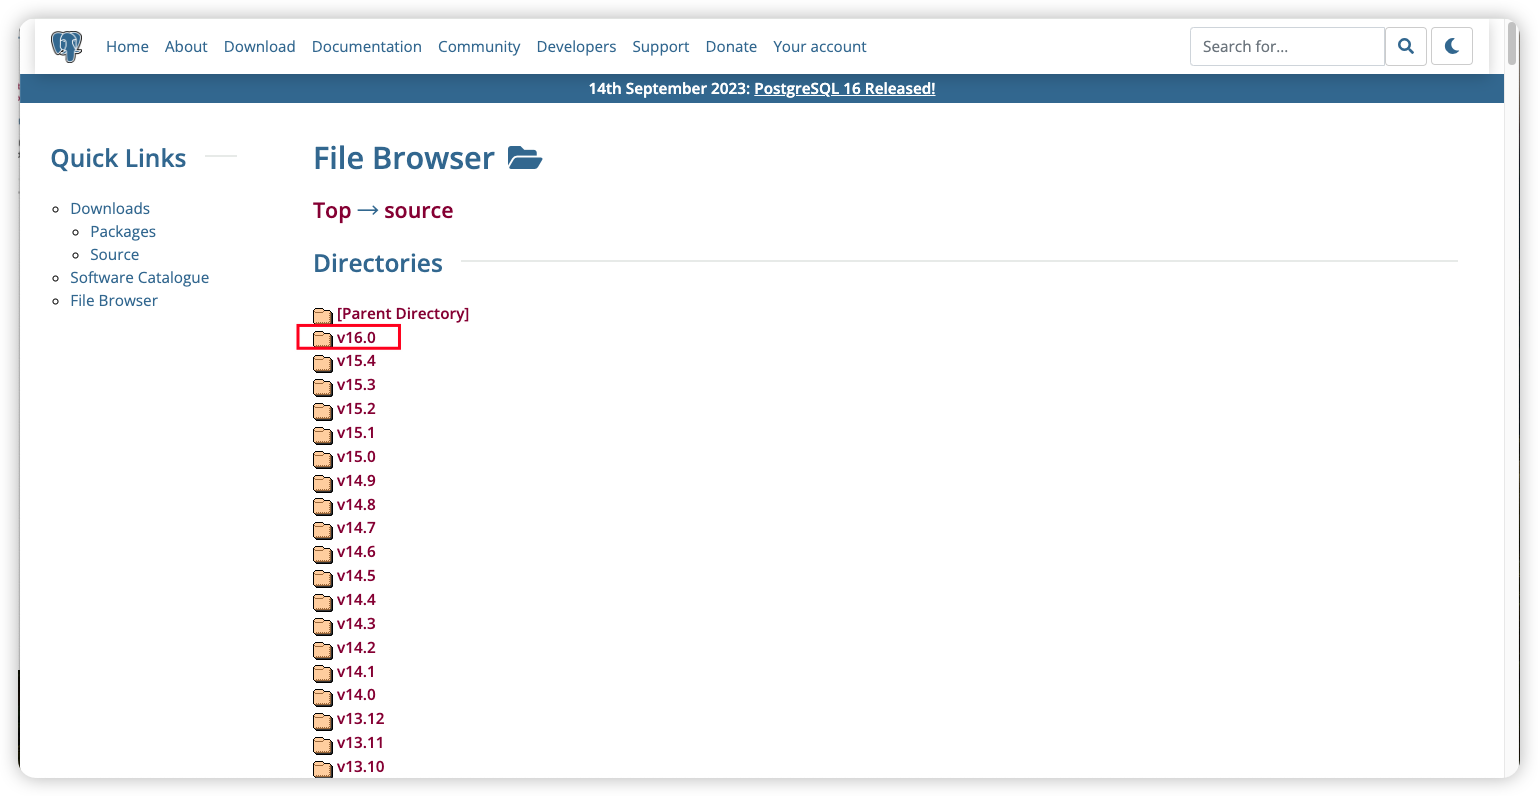
第三步:点击Source进入源码包下载页面。

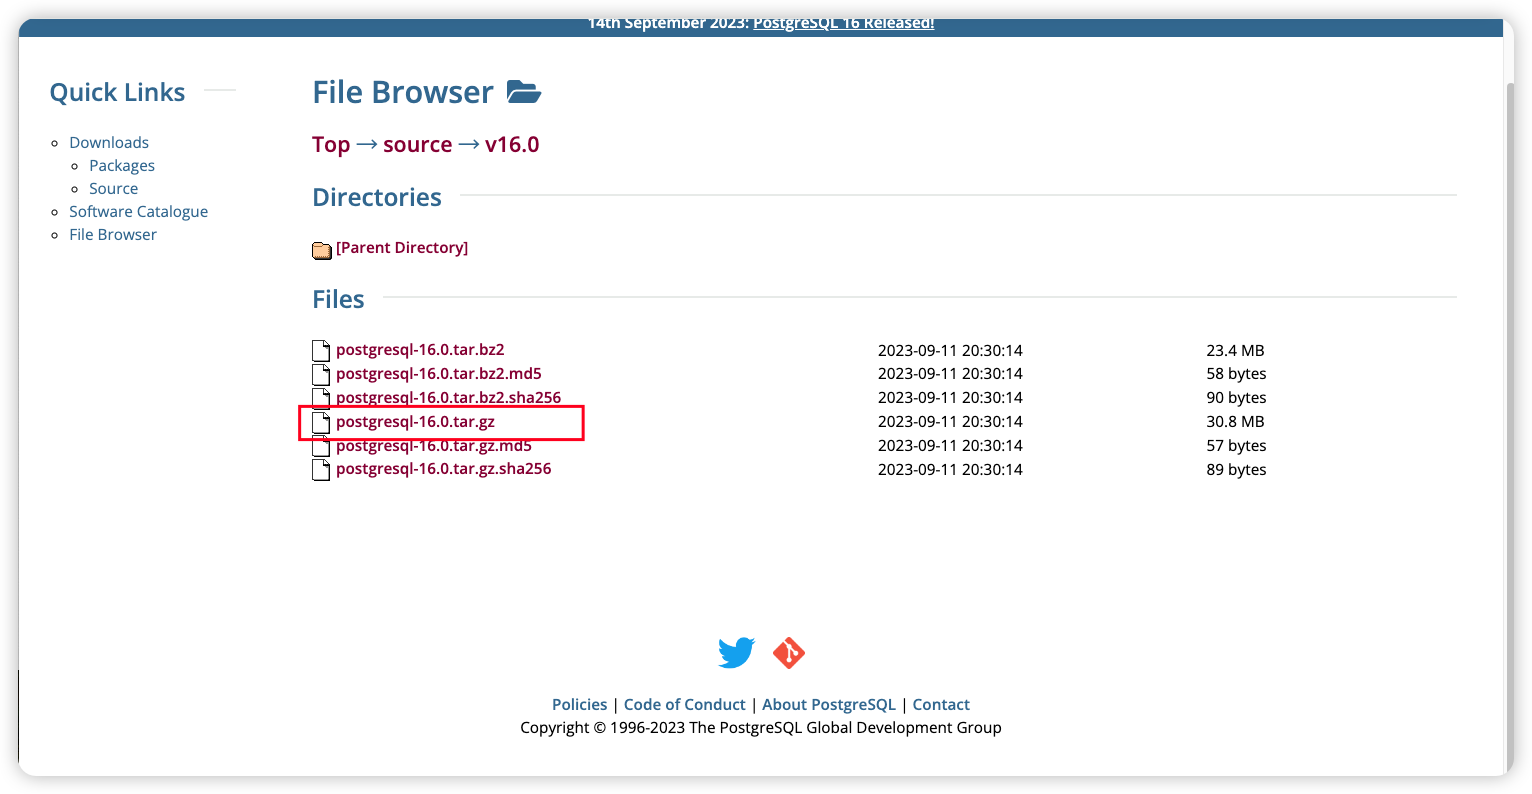
第四步:根据自己的版本需求选择相应版本的源码包


第五步:将下载后的压缩包上传到服务器上,并对压缩包进行解压。
这里我们是上传到/opt目录下,
[root@VM-16-10-centos ~]# cd /opt
[root@VM-16-10-centos opt]# ll
total 31536
drwxr-xr-x  4 root root     4096 Nov  7 19:27 mellanox
-rw-r--r--  1 root root 32283370 Nov  7 19:29 postgresql-16.0.tar.gz
drwxr-xr-x. 2 root root     4096 Oct 31  2018 rh
[root@VM-16-10-centos opt]# pwd
/opt
[root@VM-16-10-centos opt]# tar -zxvf postgresql-16.0.tar.gz
[root@VM-16-10-centos opt]# ll
total 31540
drwxr-xr-x  4 root root     4096 Nov  7 19:27 mellanox
drwxrwxrwx  6 1107 1107     4096 Sep 12 04:29 postgresql-16.0  # 这就是我们需要的解压后的源码包
-rw-r--r--  1 root root 32283370 Nov  7 19:29 postgresql-16.0.tar.gz
drwxr-xr-x. 2 root root     4096 Oct 31  2018 rh
进入到解压后的源码包下
[root@VM-16-10-centos opt]# cd postgresql-16.0/
[root@VM-16-10-centos postgresql-16.0]# ll
total 876
-rw-r--r--  1 1107 1107    365 Sep 12 04:25 aclocal.m4
drwxrwxrwx  2 1107 1107   4096 Sep 12 04:28 config
-rwxr-xr-x  1 1107 1107 584200 Sep 12 04:25 configure
-rw-r--r--  1 1107 1107  87156 Sep 12 04:25 configure.ac
drwxrwxrwx 61 1107 1107   4096 Sep 12 04:28 contrib
-rw-r--r--  1 1107 1107   1192 Sep 12 04:25 COPYRIGHT
drwxrwxrwx  3 1107 1107   4096 Sep 12 04:28 doc
-rw-r--r--  1 1107 1107   4288 Sep 12 04:25 GNUmakefile.in
-rw-r--r--  1 1107 1107    277 Sep 12 04:25 HISTORY
-rw-r--r--  1 1107 1107  64592 Sep 12 04:29 INSTALL
-rw-r--r--  1 1107 1107   1875 Sep 12 04:25 Makefile
-rw-r--r--  1 1107 1107 101920 Sep 12 04:28 meson.build
-rw-r--r--  1 1107 1107   6266 Sep 12 04:25 meson_options.txt
-rw-r--r--  1 1107 1107   1213 Sep 12 04:25 README
drwxrwxrwx 16 1107 1107   4096 Sep 12 04:29 src
[root@VM-16-10-centos postgresql-16.0]#
1.2 安装依赖包
PG依赖包安装命令:
这里分为两种情况:
- 有网络环境,可通过执行yum install 命令来安装相关依赖
- 内网环境,无法通过yum进行安装依赖包的情况
第一种情况:有网络环境,执行下面命令即可
[root@VM-16-10-centos postgresql-16.0]# yum install -y readline readline-devel zlib zlib-devel bison bison-devel flex perl-ExtUtils-Embed perl-devel \
               openssl openssl-devel pam pam-devel libxml2 libxml2-devel libxslt libxslt-devel tcl tcl-devel \
               openldap openldap-devel python python-devel gcc gcc-c++ rsync icu libicu-devel \
               e2fsprogs-devel uuid uuid-devel libuuid-devel lz4 lz4-devel epel-release
第二种情况:内网环境,无法联通网络环境。
相关依赖包:https://www.aliyundrive.com/s/uLwRnqHHB7N
将网盘中的文件夹下载后,上传至无法连通网络的服务器上。
进入该文件夹下,执行下列命令进行安装文件夹下的依赖包
rpm -ivh --force --nodeps *.rpm
需要特别注意的是,PG15及以上版本需要安装关于 Python3+ 的相关依赖包
- python3 python3-devel
1.3 预编译
进行预编译操作
[root@VM-16-10-centos postgresql-16.0]# ./configure --prefix=/usr/local/postgres/ --with-pgport=54335 --with-lz4 --with-systemd --with-libxml --enable-debug --with-tcl --with-perl --with-gssapi --with-pam --with-openssl --without-ldap --with-libxml --with-libxslt
./configure参数解释:
–prefix 参数是指定编译安装的目录;
–with-pgport 是指定psql的端口,通常为5432
–with-lz4 支持 LZ4 压缩构建。 使用 LZ4 压缩表数据。
–with-systemd 编译对systemd 服务通知的支持。如果服务器是在systemd 机制下被启动,这可以提高集成度,否则不会有影响。要使用这个选项,必须安装libsystemd 以及相关的头文件。
–with-libxml 使用 libxml2 构建,启用 SQL/XML 支持。 此功能需要 Libxml2 版本 2.6.23 或更高版本。
–enable-debug 把所有程序和库以带有调试符号的方式编译。这意味着你可以通过一个调试器运行程序来分析问题。 这样做显著增大了最后安装的可执行文件的大小,并且在非 GCC 的编译器上,这么做通常还要关闭编译器优化, 这些都导致速度的下降。但是,如果有这些符号的话,就可以非常有效地帮助定位可能发生问题的位置。目前,我们只是在你使用 GCC 的情况下才建议在生产安装中使用这个选项。
–with-tcl 制作PL/Tcl服务器编程语言。
–with-perl 制作PL/Perl服务器端编程语言。
–with-gssapi 构建支持 GSSAPI 身份验证。在许多系统上,GSSAPI 系统(通常是 Kerberos 安装的一部分) 并未安装在默认搜索的位置(例如,/usr/include、 /usr/lib),因此除此选项外,您还必须使用选项 --with-includes和–with-libraries。 configure将检查所需的头文件和库,以确保您的 GSSAPI 安装足够,然后再继续。
–with-pam 使用PAM(可插拔身份验证模块)支持构建。
–with-openssl 相当于以前的 --with-ssl=openssl.
–with-ldap 为认证和连接参数查找编译LDAP支持
–with-libxml 使用 libxml2 构建,启用 SQL/XML 支持。 此功能需要 Libxml2 版本 2.6.23 或更高版本。
–with-libxslt 使用 libxslt 构建,使xml2模块能够执行 XML 的 XSL 转换。 --with-libxml也必须指定。
1.4 进行编译安装
进行编译,安装Postgresql
[root@VM-16-10-centos postgresql-16.0]# make
# 如果编译出错之后再编译可以先执行命令删除之前的编译文件
make distclean
[root@VM-16-10-centos postgresql-16.0]# make install
1.5 创建用户及用户组
创建用户和用户组
[root@VM-16-10-centos ~]# groupadd -g 2000 postgres
[root@VM-16-10-centos ~]# useradd -g 2000 -u 2000 postgres
[root@VM-16-10-centos ~]# id postgres
[root@VM-16-10-centos ~]# groupmod -g 2000 postgres
[root@VM-16-10-centos ~]# usermod -u 2000 -g 2000 postgres
1.6 创建目录及授权
# 创建相关目录
[root@VM-16-10-centos ~]# mkdir -p /data/pgdata/{data,backups,scripts,archive_wals}
[root@VM-16-10-centos ~]# mkdir -p /data/pgdata/pg_wal
# 授权给postgres用户
[root@VM-16-10-centos ~]# chown -R postgres.postgres /data/pgdata/
[root@VM-16-10-centos ~]# chmod 0700 /data/pgdata/
1.7 设置相关环境变量
# 编辑系统配置文件
[root@VM-16-10-centos ~]#  vi /etc/profile
# 数据库安装目录
export PGHOME=/usr/local/postgres
# 数据库存放数据目录
export PGDATA=/data/pgdata/data
export PGLIB=/usr/local/postgres/lib
export LC_ALL=en_US.UTF8
export LANG=en_US.UTF8
PATH=/usr/local/postgres/bin:$PATH
export PATH
# 刷新系统配置文件
[root@VM-16-10-centos ~]# source /etc/profile
1.8 初始化数据库
# 切换到postgres用户
[root@VM-16-10-centos ~]# su - postgres
# 此处需要设置密码
[postgres@VM-16-10-centos ~]$  /usr/local/postgres/bin/initdb -D /data/pgdata/data/ -X /data/pgdata/pg_wal -W
The files belonging to this database system will be owned by user "postgres".
This user must also own the server process.
The database cluster will be initialized with locale "en_US.UTF8".
The default database encoding has accordingly been set to "UTF8".
The default text search configuration will be set to "english".
Data page checksums are disabled.
Enter new superuser password:
Enter it again:
fixing permissions on existing directory /data/pgdata/data ... ok
fixing permissions on existing directory /data/pgdata/pg_wal ... ok
creating subdirectories ... ok
selecting dynamic shared memory implementation ... posix
selecting default max_connections ... 100
selecting default shared_buffers ... 128MB
selecting default time zone ... Asia/Shanghai
creating configuration files ... ok
running bootstrap script ... ok
performing post-bootstrap initialization ... ok
syncing data to disk ... ok
initdb: warning: enabling "trust" authentication for local connections
initdb: hint: You can change this by editing pg_hba.conf or using the option -A, or --auth-local and --auth-host, the next time you run initdb.
Success. You can now start the database server using:
    /usr/local/postgres/bin/pg_ctl -D /data/pgdata/data/ -l logfile start
1.9 启动和关闭数据库
# 切换到postgres用户
[root@VM-16-10-centos ~]# su - postgres
# 启动数据库
[postgres@VM-16-10-centos ~]$ pg_ctl -D /data/pgdata/data/ -l /data/pgdata/data/logfile start
# 停止数据库
[postgres@VM-16-10-centos ~]$ pg_ctl -D /data/pgdata/data/ -l /data/pgdata/data/logfile stop
1.10 查看数据库后台进程
[postgres@VM-16-10-centos ~]$ ps -ef|grep postgres
root     10451  9193  0 20:33 pts/3    00:00:00 su - postgres
postgres 10452 10451  0 20:33 pts/3    00:00:00 -bash
postgres 11403     1  0 20:37 ?        00:00:00 /usr/local/postgres/bin/postgres -D /data/pgdata/data
postgres 11404 11403  0 20:37 ?        00:00:00 postgres: checkpointer
postgres 11405 11403  0 20:37 ?        00:00:00 postgres: background writer
postgres 11407 11403  0 20:37 ?        00:00:00 postgres: walwriter
postgres 11408 11403  0 20:37 ?        00:00:00 postgres: autovacuum launcher
postgres 11409 11403  0 20:37 ?        00:00:00 postgres: logical replication launcher
postgres 11554 10452  0 20:38 pts/3    00:00:00 ps -ef
postgres 11555 10452  0 20:38 pts/3    00:00:00 grep --color=auto postgres
1.11 验证和登陆数据库
[root@VM-16-10-centos ~]# su - postgres
[postgres@VM-16-10-centos ~]$ psql -p 54335 -U postgres -d postgres
psql (16.0)
Type "help" for help.
postgres=#
查看数据库运行状态
[postgres@VM-16-10-centos ~]$ pg_ctl -D /data/pgdata/data/ status
pg_ctl: server is running (PID: 11403)
/usr/local/postgres/bin/postgres "-D" "/data/pgdata/data"
二、修改数据库相关配置
2.1 配置postgresql.conf
数据库实例主配置文件,基本上所有的数据库参数配置都在此文件中。
[root@VM-16-10-centos ~]# # vim /data/pgdata/data/postgresql.conf
listen_addresses = '*'     # 监听IP,代表监听所有IP地址
2.2 配置pg_hba.conf
认证配置文件,配置了允许哪些IP访问数据库,及认证方式等信息。
PostgreSQL默认不允许远程访问数据库,可以通过修改监听地址、修改pg_hba.conf文件来实现远程访问。
[root@VM-16-10-centos ~]# vim /data/pgdata/data/pg_hba.conf
# 在内容的最后添加一行
host    all   all    0.0.0.0/0     md5
三、Postgresql注册服务
如果使用官方yum源或者是官方编译好的rpm包进行安装,会自动配置服务脚本;如果通过源码编译安装,则需要手动配置。
3.1 配置服务脚本
在源码包的contrib目录中有Linux、FreeBSD、OSX适用的服务脚本。将linux的脚本拷贝到/etc/init.d/目录中,将脚本重命名为postgresql,并授予可执行权限。
[root@VM-16-10-centos start-scripts]# ll
total 12
-rw-r--r-- 1 1107 1107 1441 Sep 12 04:25 freebsd
-rw-r--r-- 1 1107 1107 3526 Sep 12 04:25 linux
drwxrwxrwx 2 1107 1107 4096 Sep 12 04:28 macos
[root@VM-16-10-centos start-scripts]# pwd
/opt/postgresql-16.0/contrib/start-scripts
# 复制文件到目标位置
[root@VM-16-10-centos start-scripts]# cp linux /etc/init.d/postgresql
# 授予可执行权限
[root@VM-16-10-centos start-scripts]# chmod +x /etc/init.d/postgresql
[root@VM-16-10-centos start-scripts]# ll /etc/init.d/postgresql
-rwxr-xr-x 1 root root 3526 Nov  7 21:06 /etc/init.d/postgresql
[root@VM-16-10-centos start-scripts]#
修改/etc/init.d/postgresql的内容
将prefix设置为PostgreSQL的安装路径:/usr/local/postgresql
将PGDATA设置为PostgreSQL的数据目录路径:/data/pgdata/data
[root@VM-16-10-centos ~]# vi /etc/init.d/postgresql
# Installation prefix
prefix=/usr/local/postgres
# Data directory
PGDATA="/data/pgdata/data"
# 重新加载注册文件
[root@VM-16-10-centos ~]# systemctl daemon-reload
此时已经是加入到systemctl管理了
3.2 验证是否成功注册服务
[root@VM-16-10-centos ~]# systemctl status postgresql
● postgresql.service - SYSV: PostgreSQL RDBMS
   Loaded: loaded (/etc/rc.d/init.d/postgresql; bad; vendor preset: disabled)
   Active: active (exited) since Tue 2023-11-07 21:27:24 CST; 3 days ago
     Docs: man:systemd-sysv-generator(8)
Nov 07 21:27:24 VM-16-10-centos systemd[1]: Starting SYSV: PostgreSQL RDBMS...
Nov 07 21:27:24 VM-16-10-centos su[23946]: (to postgres) root on none
Nov 07 21:27:24 VM-16-10-centos postgresql[23945]: Starting PostgreSQL: ok
Nov 07 21:27:24 VM-16-10-centos systemd[1]: Started SYSV: PostgreSQL RDBMS.
这样就算是成功了可以使用systemctl来管理Postgresql启动、停止等一系列操作。
四、修改相关密码
4.1 修改用户postgres的密码
PostgreSQL数据库默认创建管理员账号:postgres;修改其密码,仅需一下三步:
1、首先,登录PostgreSQL
[root@VM-16-10-centos ~]# su - postgres
[postgres@VM-16-10-centos ~]$ psql -p 54335 -U postgres -d postgres
psql (16.0)
Type "help" for help.
postgres=#
2、然后,修改账号postgres的密码
postgres=# ALTER USER postgres WITH PASSWORD '修改的密码';
3、最后,退出pgsql客户端
postgres=# exit
4.2 修改linux系统postgres用户的密码
PostgreSQL都会创建一个默认的linux用户postgres,修改该用户密码的方法如下:
1、先删除用户postgres的历史密码
[root@VM-16-10-centos ~]# passwd -d postgres
2、重新设置用户postgres的密码
[root@VM-16-10-centos ~]# sudo -u postgres passwd
3、按照系统提示,输入两次新的密码,即可搞定。
Enter new UNIX password:
Retype new UNIX password:
passwd: password updated successfully


