- SpringBoot简介
- mybatis 批量查询时候多条件,怎么写?
- Error: listen EACCES: permission de
- SpringBoot调用第三方WebService接口的两种实现方式
- SpringBoot+内置Tomcat配置,参数调优,最大并发量,最大
- 图数据库Neo4j——SpringBoot使用Neo4j &
- Groovy系列三 Java SpringBoot 整合 Groovy
- 配置SSL证书后,Nginx的HTTPS 不能正常
- Mysql 时区差8小时的多种问题 统统解决
- Python爬虫技术系列-05字符验证码识别
- springboot数字物流仓库管理系统 计算机毕设源码33014
- SpringBoot下进行单元测试
- 代码优雅升级,提升开发效率:挖掘Spring AOP配置的学习宝藏!
- SQL Server数据库 -- 表的创建与管理
- 10.网络爬虫—MongoDB详讲与实战
- 数据库——范式
- 【Spring Security】认证&密码加密&To
- 基于EasyExcel的数据导入导出(复制可用)
- Springboot+dynamic-datasource+Druid
- 【Cisco Packet Tracer】路由器实验 静态路由RIPO
- skywalking(一)skywalking部署及集成Springb
- 【框架篇】Spring Boot 日志
- nginx访问页面中文乱码解决方案
- (详细版)java实现小程序获取微信登录,用户信息,手机号,头像
- SpringBoot使用Mybatis-Plus中分页出现total=
- 基于SpringBoot的在线学生请假管理系统的设计与实现 毕业设计-
- @Autowired报错Could not autowire. No
- SpringSecurity6从入门到上天系列第九篇:SpringSe
- SQL Server 数据库出现可疑标记的解决方法
- Linux系统 利用conda更改gcc、g++版本(非root用户)
Mybatis-Plus详解(新建maven项目、查询所有信息、打印SQL日志、实现CRUD(增删改查)、分页、条件查询且分页,前后端分离式开发)
MyBatis-Plus(opens new window) (简称MP) 是一个MyBatis(opens new window)的增强工具,在MyBatis的基础上只做增强不做改变,为简化开发、提高效率而生。想查看官网相关内容的化我这里提供了官网地址:https://baomidou.com/
特点
无侵入:只做增强不做改变,引入它不会对现有工程产生影响,如丝般顺滑
损耗小:启动即会自动注入基本CRUD,性能基本无损耗,直接面向对象操作
强大的CRUD操作:内置通用Mapper、通用Service,仅仅通过少量配置即可实现表单大部分CRUD操作,更有强大的条件构造器,满足各类使用需求
支持Lambda形式调用:同Lambda表达式,方便的编写各种类查询条,无需再担心字段写错
支持主键自动生成:支持多达4种主键策略(内容分布式唯一ID生成器 - Sequence),可自由配置,完美解决主键问题
支持ActiveRecord模式:支持ActiveRecord形式调用,实体类只需要继承Model类即可进行强大的CRUD操作
支持自定义全局通用操作:支持全局通用方法注入(write once,use anywhere)
内置代码生成器:采用代码或者Maven插件可快速生成Mapper、Model、Service、Controller、层代码,支持模板引擎,更有超多自定义配置可以使用
内置分页插件:基本MyBatis物理分页,开发者无需关心具体操作,配置好插件之后,编写分页等同与普通List查询
分页插件支持多种数据库:支持MySQL、MariaDB、Oracle、DB2、H2、HSQL、SQLite、Postgre、SQLServer等多种数据库
内置性能分析插件:可输出SQL语句以及其执行时间,建议开发测试时启用该功能,能快速揪出慢查询
内置全局拦截插件:提供全表delete、update操作智能分析阻断,也可以自定义拦截规则,预防误 操作
MyBatis-Plus入门
创建maven项目
创建如下图所示步骤的maven项目结构:
第一步:
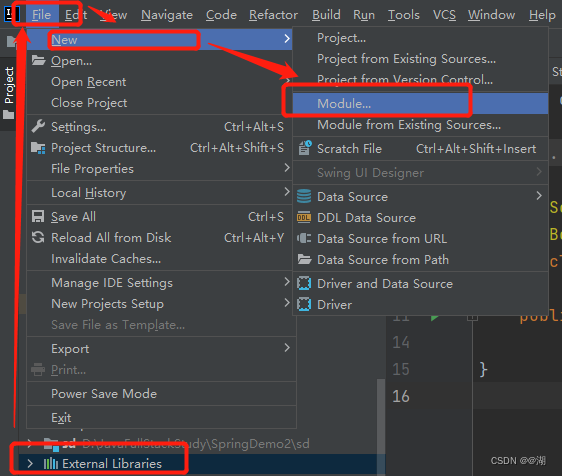
第二步:
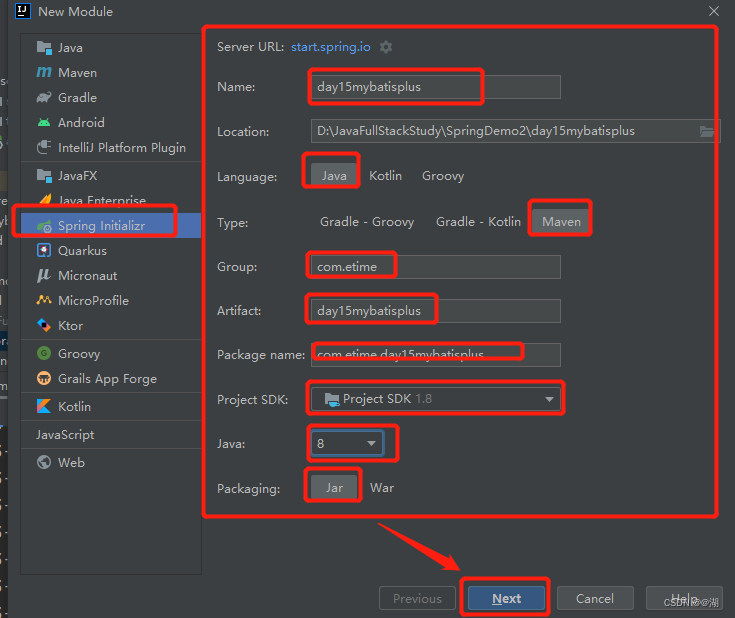
点击下一步next
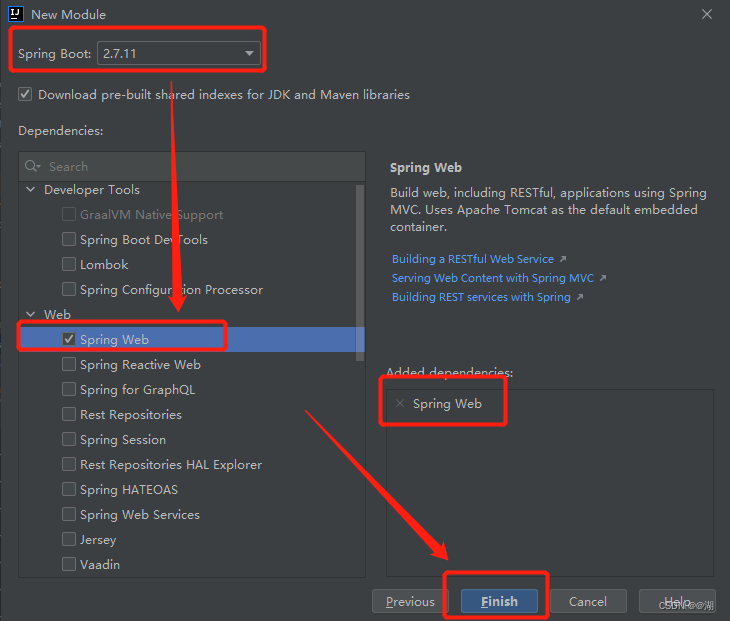
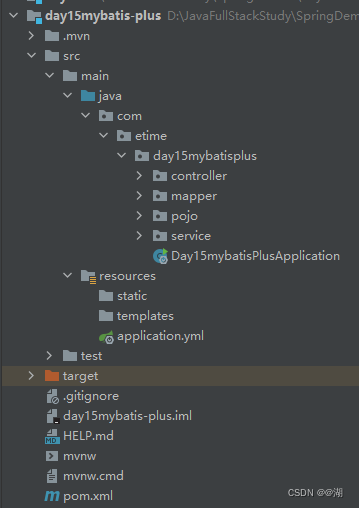
最后项目结构:
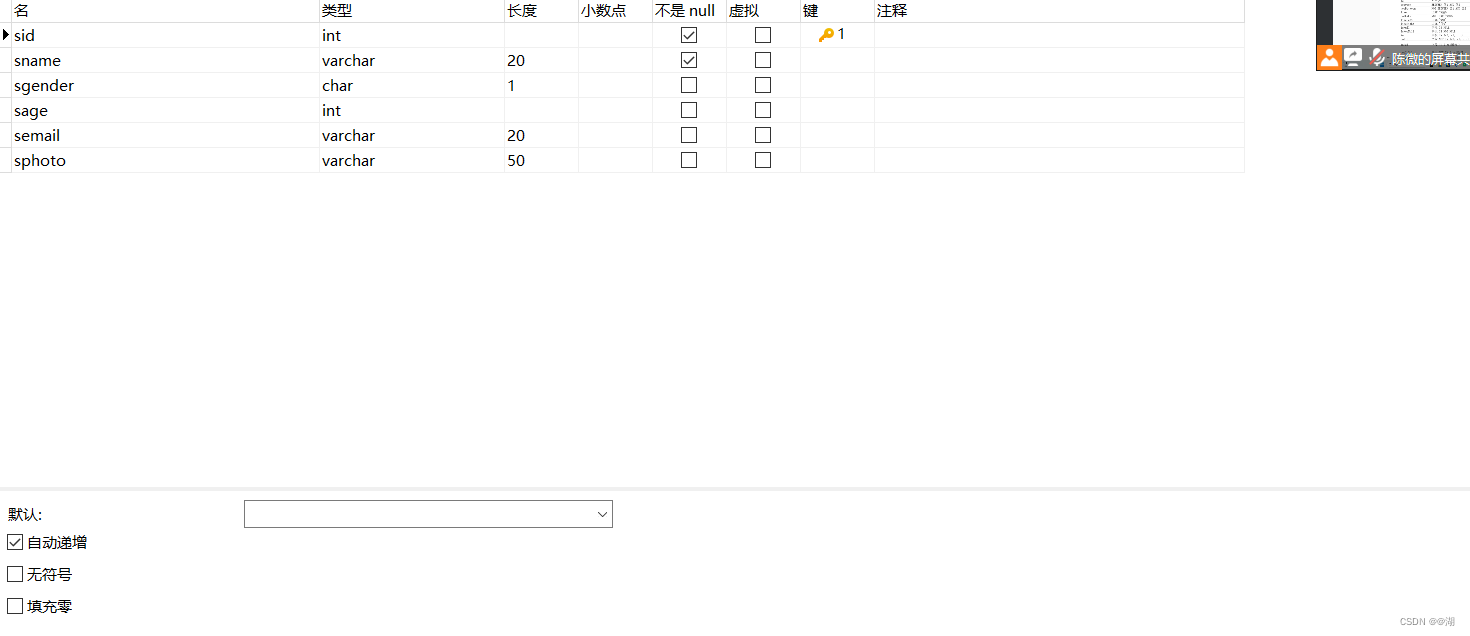
准备数据库:
添加依赖
1、向pom.xml中添加指定的依赖
            org.projectlombok
            lombok
            1.18.16


            org.springframework.boot
            spring-boot-devtools


            mysql
            mysql-connector-java
            8.0.11
            runtime


            junit
            junit
            4.12
            test


            com.baomidou
            mybatis-plus-boot-starter
            3.5.1


                org.springframework.boot
                spring-boot-maven-plugin
                2.7.11
编写配置文件yml
2、因为我这里习惯使用.yml作为属性配置文件,所以更改属性文件,并编写相关sql配置
application.yml
server:
  port: 8888
spring:
  devtools:
    restart:
      enabled: true
      additional-paths: "src/main/java"
      exclude: "static/**"
  datasource:
    username: "root"
    password: "h123456"
    driver-class-name: "com.mysql.cj.jdbc.Driver"
    url: "jdbc:mysql://localhost:3306/db_school?serverTimezone=UTC&useUnicode=true&characterEncoding=utf-8&useSSL=false"
入门示例编写和测试
1、创建StudentMapper.java 接口
package com.etime.day15mybatisplus.mapper;
import com.baomidou.mybatisplus.core.mapper.BaseMapper;
import com.etime.day15mybatisplus.pojo.Student;
import org.springframework.stereotype.Repository;
//引注入StudentMapper类
@Repository
//记得BaseMapper的泛型加上学生类Student
public interface StudentMapper extends BaseMapper {
}
2、创建StudentService.java接口
package com.etime.day15mybatisplus.service;
import com.etime.day15mybatisplus.pojo.Student;
import java.util.List;
public interface StudentService {
    //获取所有学生信息
    List getAllStudent();
}
3、创建StudentService.java接口的实现类StudentServiceImpl.java
package com.etime.day15mybatisplus.service.impl;
import com.etime.day15mybatisplus.mapper.StudentMapper;
import com.etime.day15mybatisplus.pojo.Student;
import com.etime.day15mybatisplus.service.StudentService;
import org.springframework.beans.factory.annotation.Autowired;
import org.springframework.stereotype.Service;
import java.util.List;
//注入service
@Service
public class StudentServiceImpl implements StudentService {
    //通过@Autowired注解将StudentMapper接口注入
    @Autowired
    private StudentMapper studentMapper;
    @Override
    public List getAllStudent() {
        //获取学生的全部信息
        List list = studentMapper.selectList(null);
        return list;
    }
}
4、创建StudentController.java类控制层
package com.etime.day15mybatisplus.controller;
import com.etime.day15mybatisplus.pojo.Student;
import com.etime.day15mybatisplus.service.StudentService;
import org.springframework.beans.factory.annotation.Autowired;
import org.springframework.web.bind.annotation.GetMapping;
import org.springframework.web.bind.annotation.RestController;
import java.util.List;
//使用RestController注解可以除了包含了Controller其中都包含了@ResponseBody注解
@RestController
public class StudentController {
    //使用注解@Autowired将接口StudentService注入
    @Autowired
    private StudentService studentService;
    //使用查询的提交注解@GetMapping方式
    //查询所有学生信息
    @GetMapping("/student")
    public List getAllStudent(){
        return studentService.getAllStudent();
    }
}
5、在Application启动类中加入mapper的文件扫描
package com.etime.day15mybatisplus;
import org.mybatis.spring.annotation.MapperScan;
import org.springframework.boot.SpringApplication;
import org.springframework.boot.autoconfigure.SpringBootApplication;
//注入mapper文件扫描
@MapperScan("com.etime.day15mybatisplus.mapper")
@SpringBootApplication
public class Day15mybatisPlusApplication {
    public static void main(String[] args) {
        SpringApplication.run(Day15mybatisPlusApplication.class, args);
    }
}
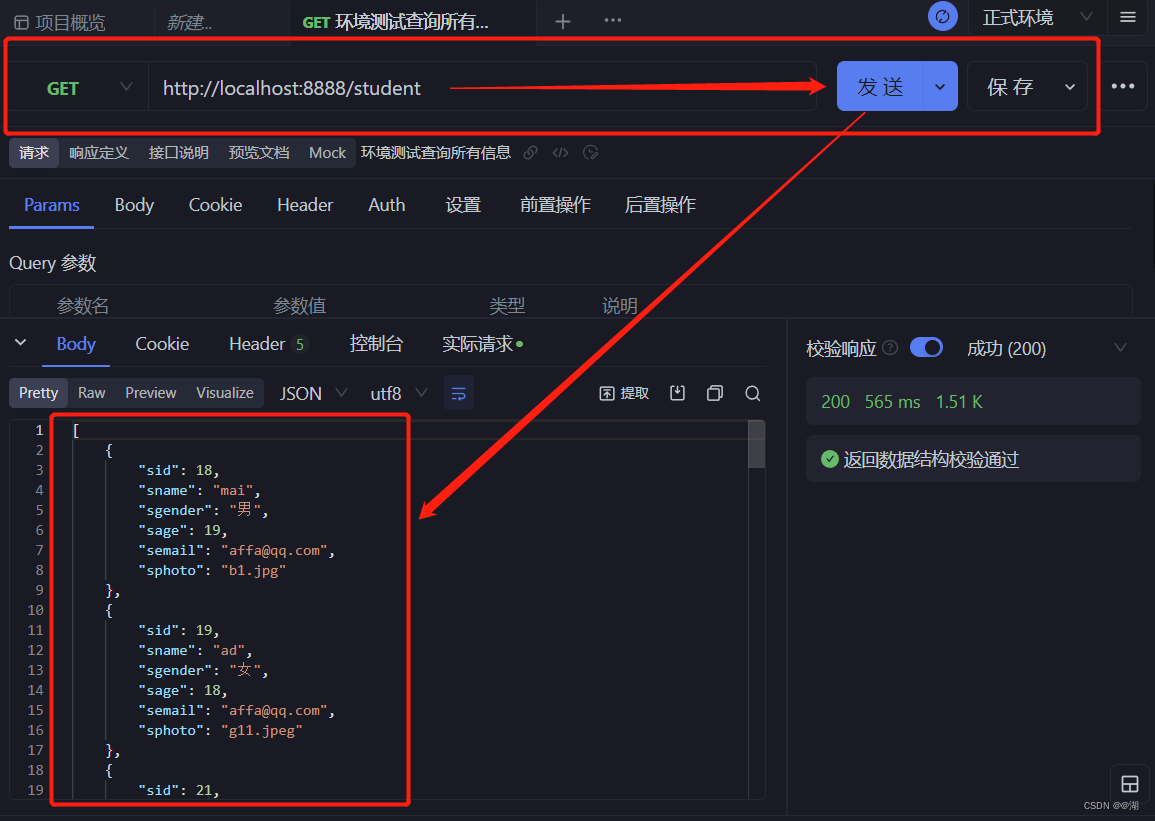
6、运行结果:
使用Apifox接口测试工具进行测试(如有需要可以去看这篇文章下载安装和使用:https://blog.csdn.net/m0_56245143/article/details/130270652?spm=1001.2014.3001.5501)
MyBatis-Plus打印SQL日志
在application.xml文件中,配置日志打印:
mybatis-plus:
  configuration:
    log-impl: org.apache.ibatis.logging.stdout.StdOutImpl
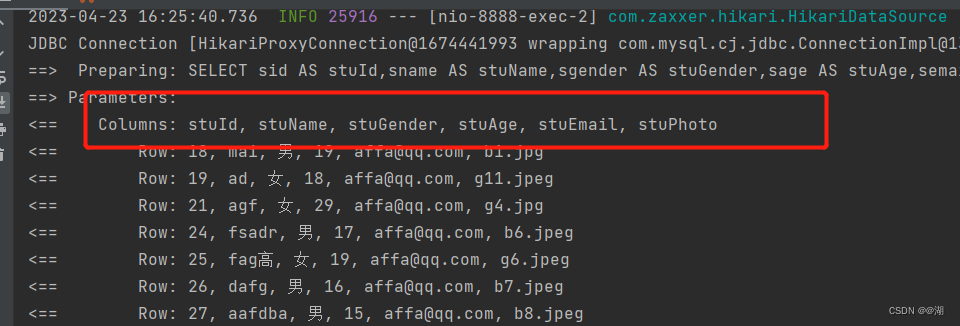
再次测试上述查看idea控制台:

MyBatis-Plus用在实体类属性上的注解配置
更改后的学生类对象:Student.java
package com.etime.day15mybatisplus.pojo;
import com.baomidou.mybatisplus.annotation.TableField;
import com.baomidou.mybatisplus.annotation.TableId;
import com.baomidou.mybatisplus.annotation.TableName;
import lombok.AllArgsConstructor;
import lombok.Data;
import lombok.NoArgsConstructor;
@NoArgsConstructor
@AllArgsConstructor
@Data
//@TableName("tb_student") //如果数据库表进行了更改,使用@TableName注解
public class Student {
    //还有一种情况是当实体类中的属性字段名和数据库表不一样,
    // 需要注意主键分别需要使用注解@TableId("")放入和数据库表主键名一样
    @TableId("sid")
    private int stuId;
    //除了主键不一样,其他属性使用@TableField("")注解
    @TableField("sname")
    private String stuName;
    @TableField("sgender")
    private String stuGender;
    @TableField("sage")
    private int stuAge;
    @TableField("semail")
    private String stuEmail;
    @TableField("sphoto")
    private String stuPhoto;
}
运行结果:
MyBatis-Plus实现CRUD(实现增、删、改、查功能)
新增学生信息
1、在StudentService.java接口中添加学生新增方法
//新增学生信息
    int addStudent(Student student);
2、在StudentServiceImpl对StudentService接口实现类中编写重写新增方法
//新增学生信息
    @Override
    public int addStudent(Student student) {
        return studentMapper.insert(student);
    }
3、在StudentController.java类中编写学生信息新增方法
//添加学生信息使用的是@PostMapping注解提交的方式
    @PostMapping("/student")
    public int addStudent(Student student){
        return studentService.addStudent(student);
    }
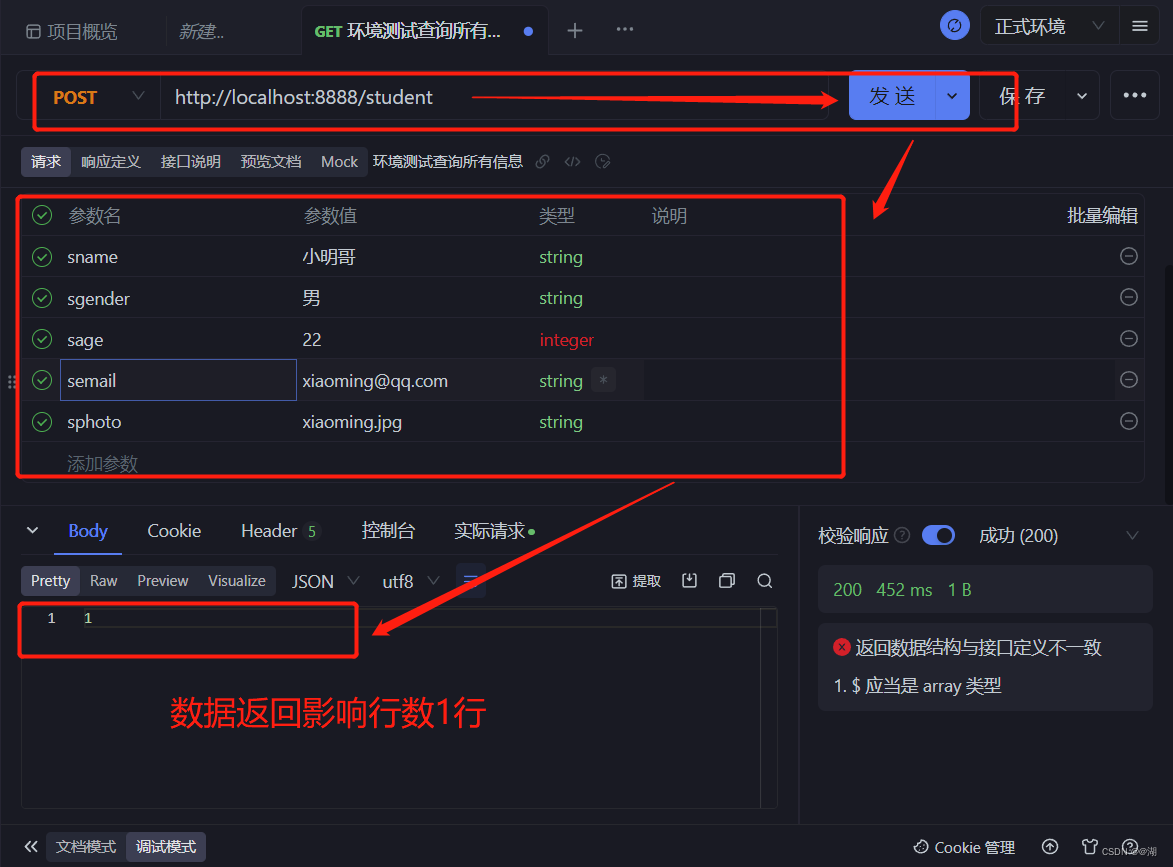
4、运行结果:
使用Apifox工具进行测试:
对学生信息进行修改
1、在StudentService.java接口中编写学生信息修改方法
//对学生信息进行修改
    int updateStudent(Student student);
2、在StudentServiceImpl对StudentService接口实现类中编写重写学生更新方法
//修改学生信息
    @Override
    public int updateStudent(Student student) {
        //根据学生id对学生信息进行修改阿
        return studentMapper.updateById(student);
    }
3、在StudentController.java类中编写修改学生信息的方法
//修改学生信息使用@PutMapping注解提交的方式
    @PutMapping("/student")
    public int updateStudent(Student student){
        return  studentService.updateStudent(student);
    }
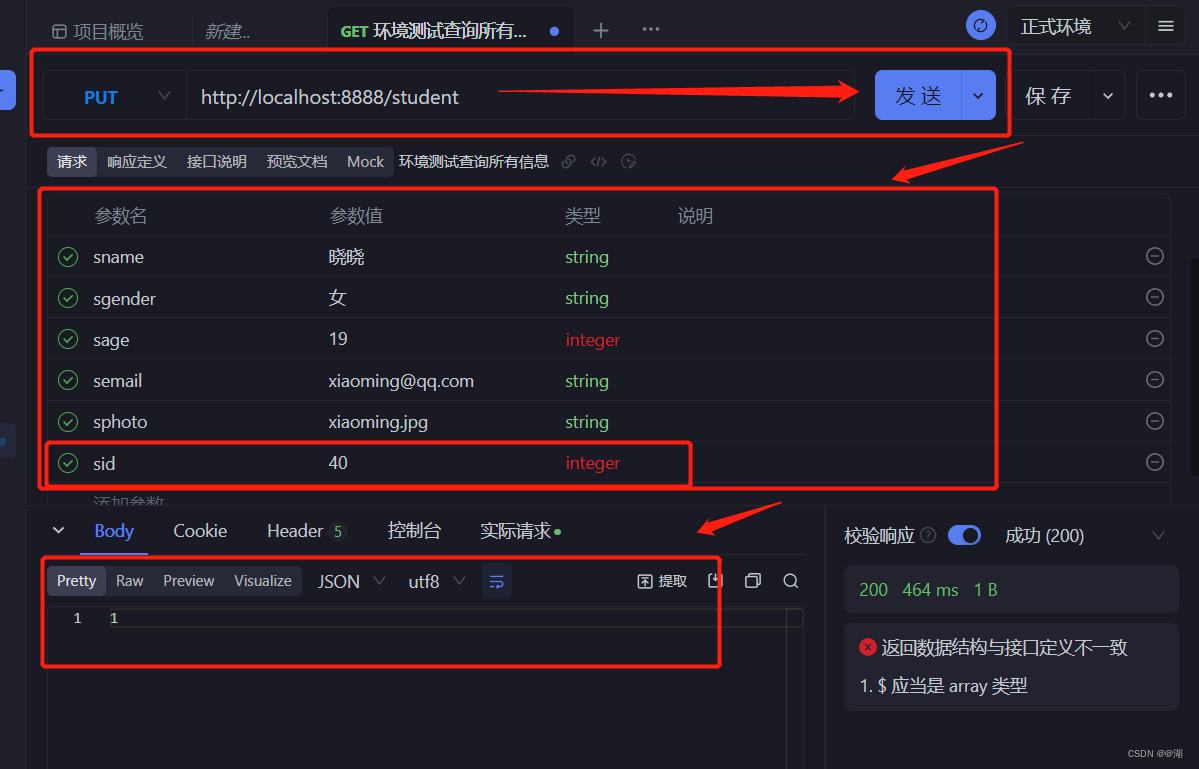
4、运行结果:
根据学生id删除学生信息
1、在StudentService.java接口中编写根据学生id删除学生信息的方法
//根据学生id删除学生信息
    int deleteStudent(int sid);
2、在StudentServiceImpl对StudentService接口的实现类内编写根据学生id删除学生信息的方法
//根据学生id删除学生信息
    @Override
    public int deleteStudent(int sid) {
        return studentMapper.deleteById(sid);
    }
3、在控制类StudentController.java控制类中编写根据学生id删除学生信息
//根据学生id对学生信息进行删除使用@DeleteMapping注解的方式提交
    @DeleteMapping("/student/{sid}")
    public int deleteStudent(@PathVariable("sid") int sid){
        return studentService.deleteStudent(sid);
    }
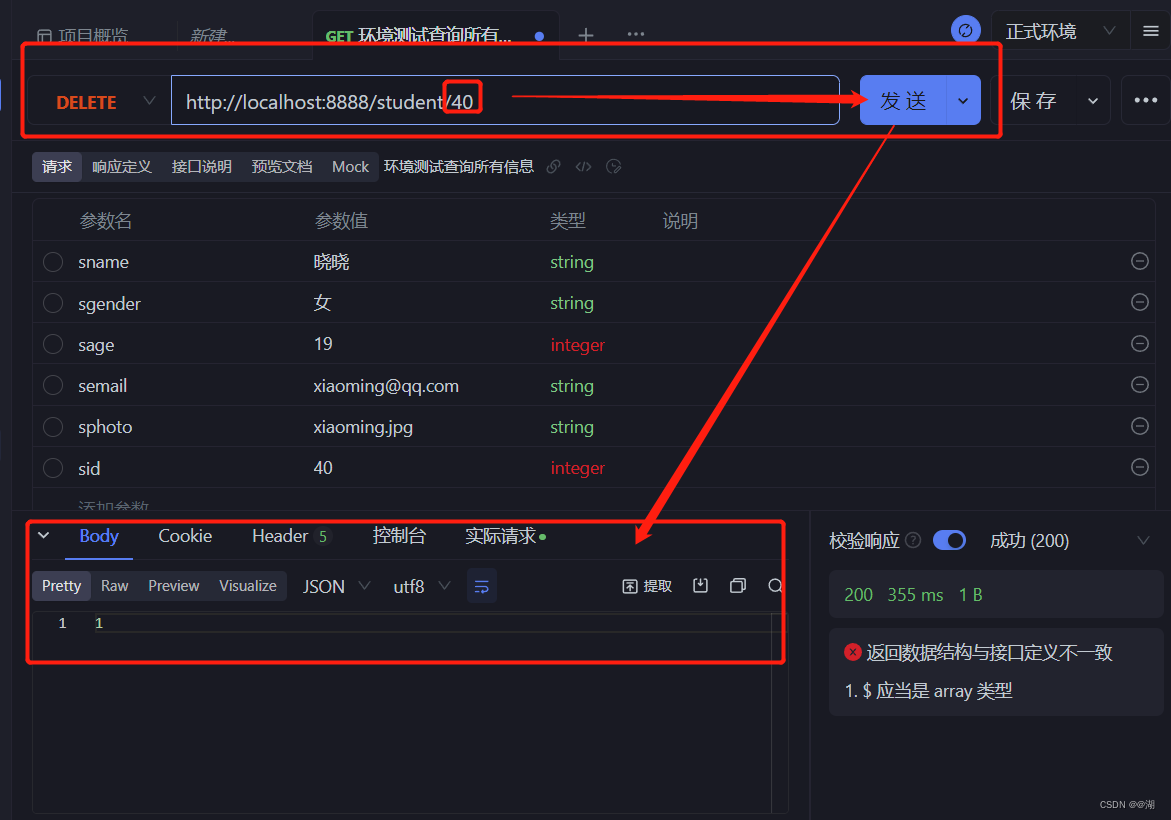
4、运行结果:
分页查询
使用MyBatis-Plus内置的分页插件,需要配置相关内容,创建配置类MybatisPlusConfig.java完成配置
插件配置MybatisPlusConfig.java
package com.etime.day15mybatisplus.util;
import com.baomidou.mybatisplus.annotation.DbType;
import com.baomidou.mybatisplus.extension.plugins.MybatisPlusInterceptor;
import com.baomidou.mybatisplus.extension.plugins.inner.PaginationInnerInterceptor;
import org.springframework.context.annotation.Bean;
import org.springframework.context.annotation.Configuration;
@Configuration   //注入解析相关配置文件
public class MybatisPlusConfig {
    @Bean  //将当前类对象注入
    public MybatisPlusInterceptor paginationInterceptor(){
        MybatisPlusInterceptor interceptor = new MybatisPlusInterceptor();
        //指定数据库为MySQL
        interceptor.addInnerInterceptor(new PaginationInnerInterceptor(DbType.MYSQL));
        return interceptor;
    }
}
1、在StudentService.java接口类中编写查询所有数据并进行分页方法
//无条件查询数据分页
    Page getStudentByPage(int current,int size);
2、在StudentServiceImpl.java对StudentService接口实现类中编写查询所有数据并进行分页的方法
 //无条件数据查询分页(即对所有数据进行查询分页)
    @Override
    public Page getStudentByPage(int current, int size) {
        Page page = new Page<>(current,size);
        return studentMapper.selectPage(page,null);
    }
3、在控制层StudentContrroller.java类中编写实现方法
//使用无条件查询数据分页使用@GetMapping对数据进行提交和注入
	@GetMapping("/student/page")
    public Page getStudentByPage(int current,int size){
        return studentService.getStudentByPage(current,size);
    }
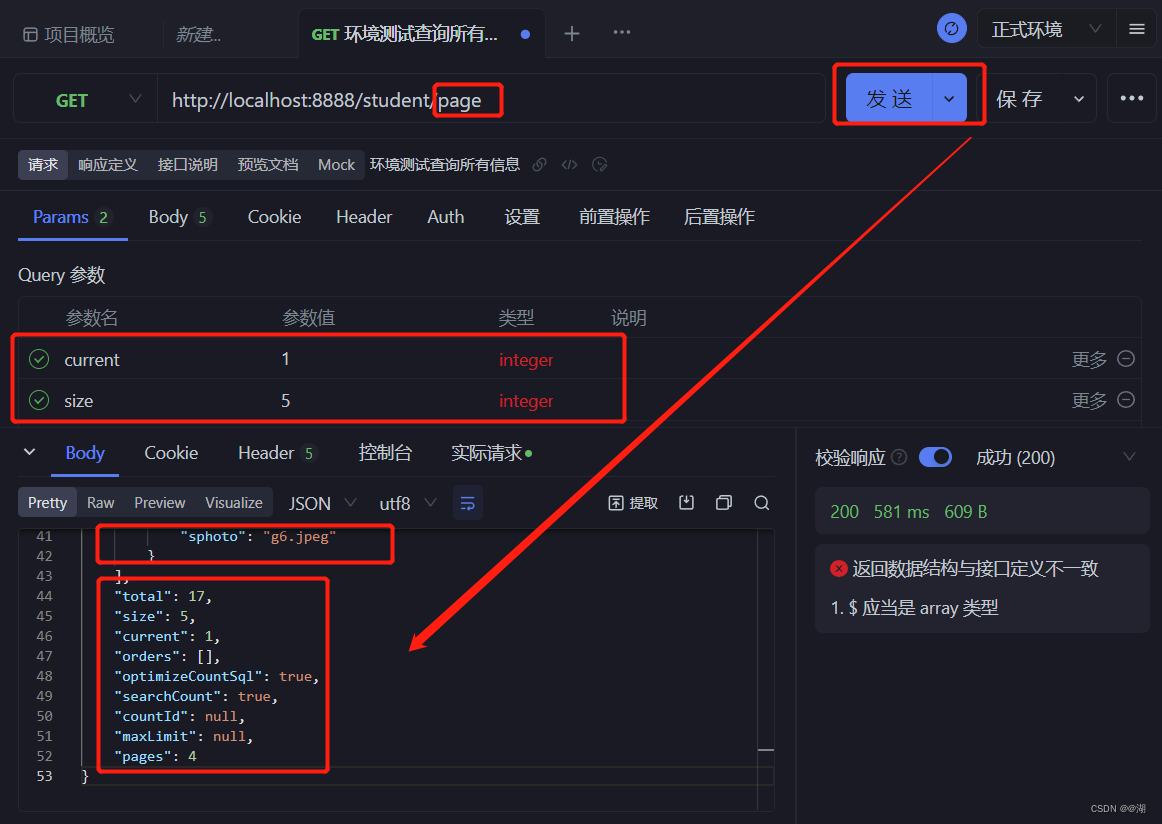
4、运行结果:
条件查询且分页
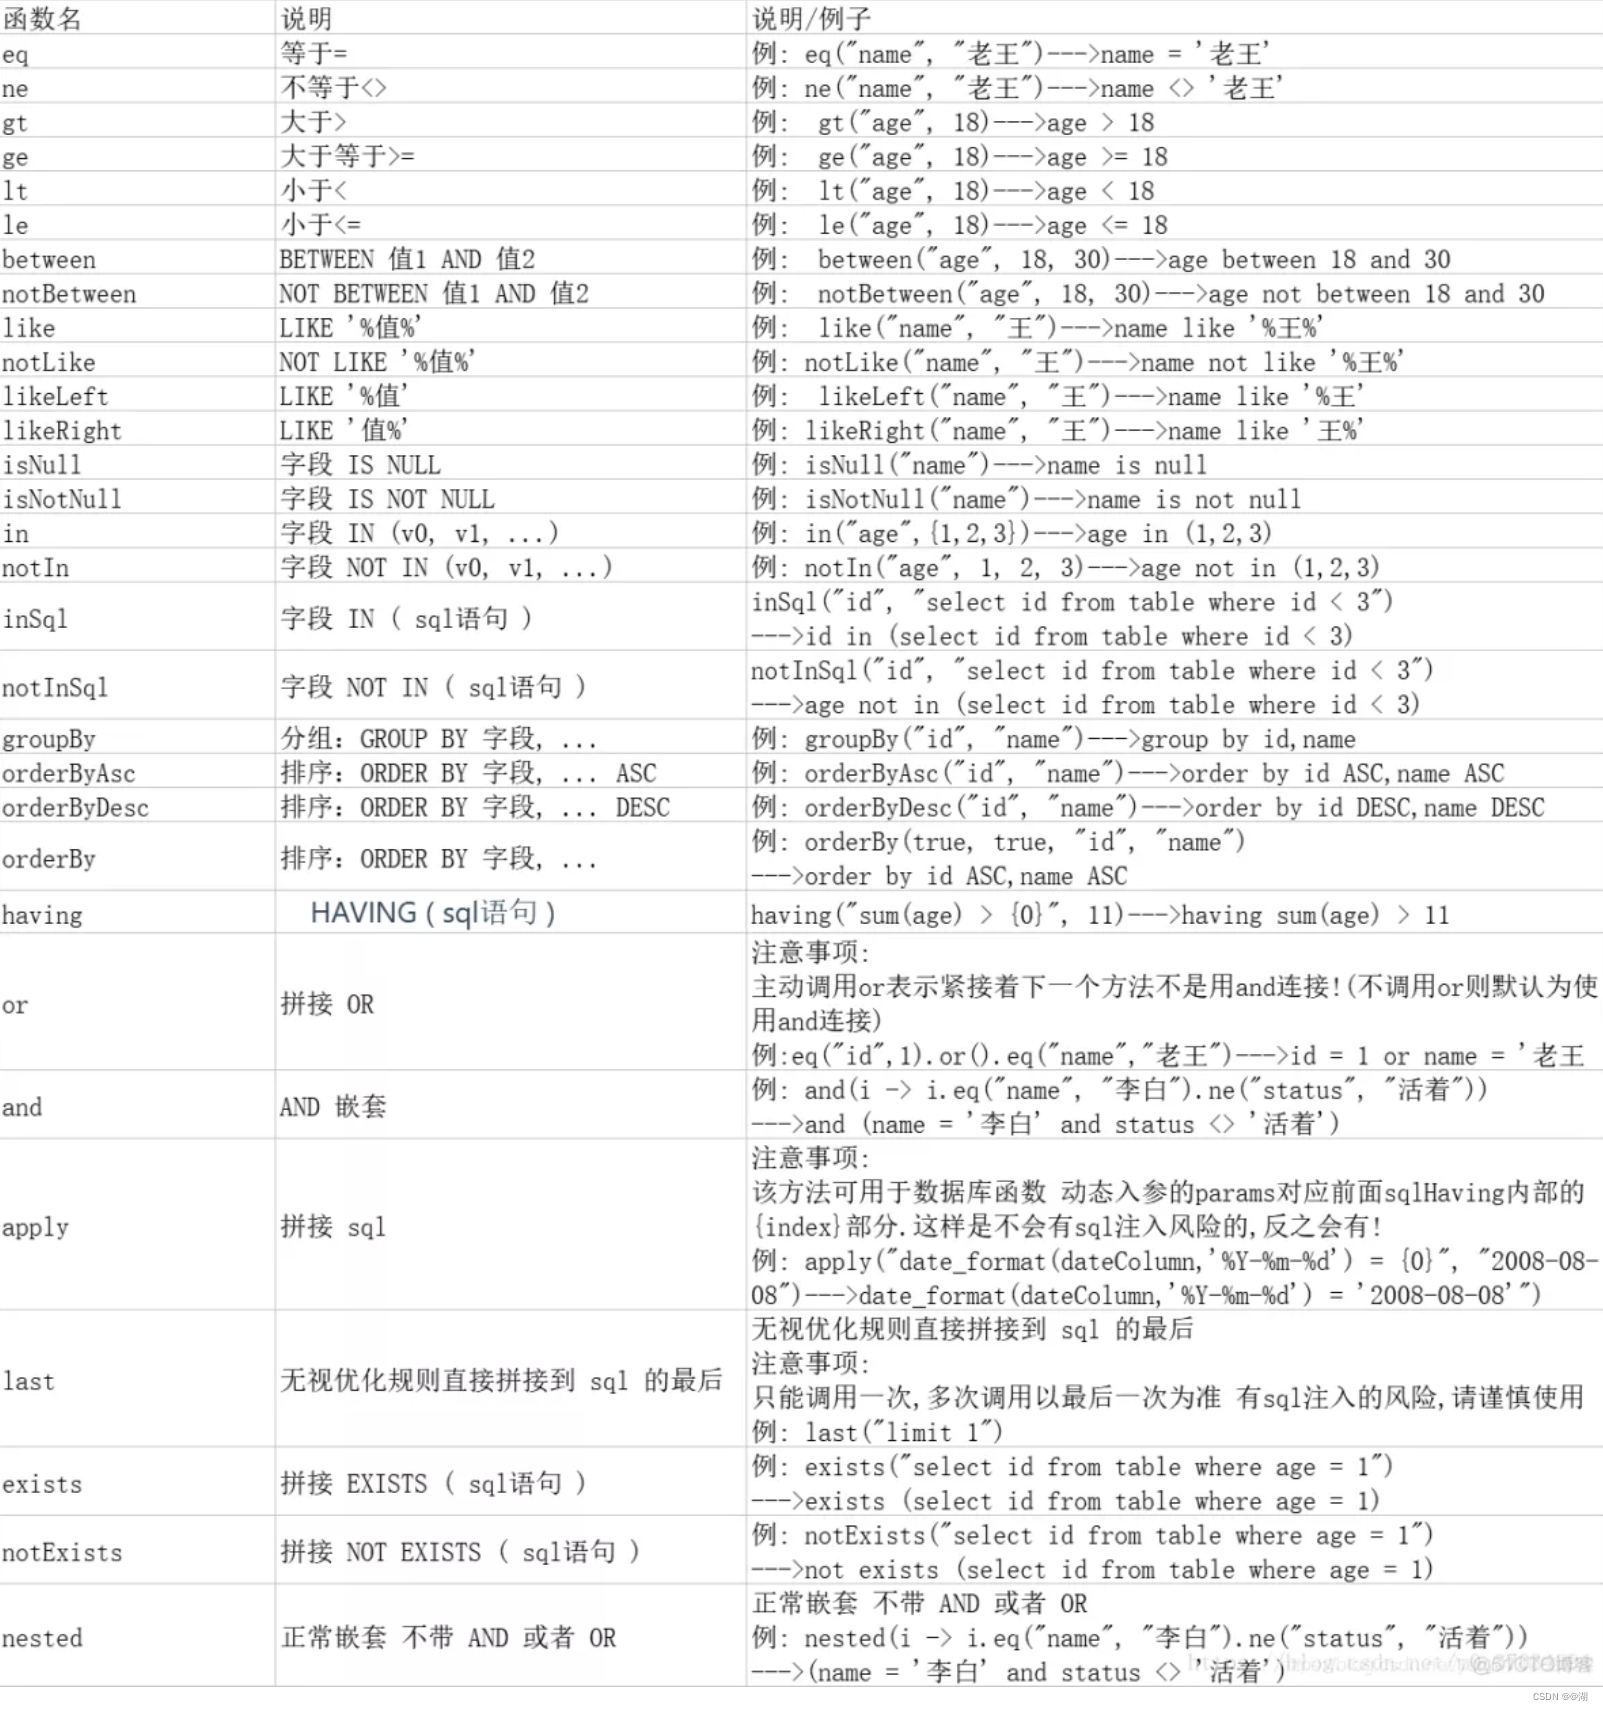
MyBatis-Plus内置的查询器,可以帮助我们来做各种各样的条件查询
如下是基本的常用方法表:
1、在StudentService.java接口中编写条件查询且分页的方法
//条件查询且分页
    Page getStudentBySname(String sname,int courrent,int size);
2、在StudentServiceImpl对StudentService接口实现类中编写条件查询且分页的方法
//条件查询且分页
    @Override
    public Page getStudentBySname(String sname, int courrent, int size) {
        QueryWrapper wrapper = new QueryWrapper<>();
        //将条件加入到wrapper对象中
        wrapper.like("sname",sname);
        Page page = new Page<>(courrent,size);
        return studentMapper.selectPage(page,wrapper);
    }
3、在StudentController.java控制类中添加实现条件查询且分页的方法
//条件查询且分页使用@GetMapping对数据进行提交和数据注入
    @GetMapping("student/like")
    public Page getStudentBySname(String sname,int current,int size){
        return studentService.getStudentBySname(sname,current,size);
    }
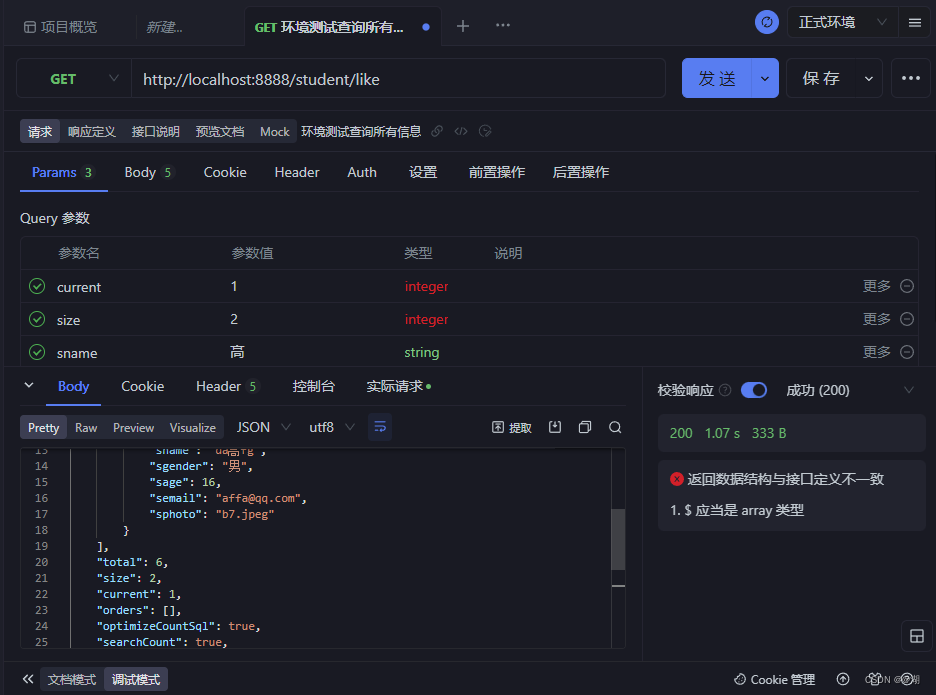
4、运行结果:
前后端分离式开发整合
由于前面的准备其实基本的代码时没有任何问题的,现在用上述已经完成没问题的情况下对其进行前后端分离式开发的方式采用Vue3前端进行编写html页面测试:
分页展示学生信息:
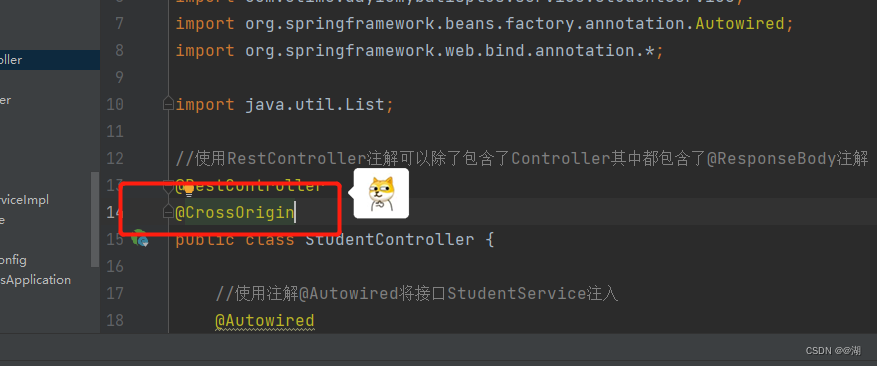
解决跨域问题
首先解决的问题是通过idea和VScode开发工具的跨域问题:
在Controller层加上注解@CrossOrigin解决跨域问题,如图:
在VScode中编写studentInfo.html文件:
Document
运行结果:
