- 前端开发新趋势:Web3、区块链和虚拟现实
- 饥荒服务器面板 dst-admin-go 版本安装
- Spring Boot + MinIO 实现文件切片极速上传技术
- 编写后端接口步骤
- 【Cisco Packet Tracer】路由器实验 静态路由RIPO
- SpringBoot整合Mybatis-Plus、Druid配置多数据
- node.js 安装及配置环境变量只看此文
- 【⑦MySQL】· 一文了解四大子查询
- Spring Boot学习随笔- 文件上传和下载(在线打卡、附件下载、
- Tomcat在linux环境中开机自启(定时重启)
- 【Golang】排查 Build constraints exclud
- java 对接国标摄像头流程、代码整合 springboot SIP
- 登录rabbitMQ管理界面时浏览器显示要求进行身份验证,与此站点连接
- 【MySQL5.7麒麟系统,ARM架构下离线安装,搭建主从集群】
- Nginx请求参数解析
- IDEA 开发一个简单的 web service 项目,并打包部署到
- Apache Doris (四) :Doris分布式部署(一) FE部
- MybatisPlusInterceptor实现sql拦截器(超详细)
- 【Spring Cloud】Server check fail, pl
- 数据库sql语句(视图的创建)
- Ueditor 百度强大富文本Springboot 项目集成使用(包含
- SpringBoot+Mybatis-Plus实现增删改查(配视频讲解
- nginx报错(error while loading shared
- 【Spring Cloud】基于 Feign 实现远程调用,深入探索
- 群晖Drive搭建结合内网穿透实现云同步Obsidian笔记文件
- cas登录流程解析及springboot集成cas
- Dynamic DataSource 多数据源配置【 Springbo
- 使用PHPStudy在本地快速建立网站并实现局域网外访问(无公网IP)
- springboot基础--实现默认登录页面
- java.sql.SQLException: No value spe
目录
- 创建一个spring boot 项目
- spring boot 中的配置体系
- 配置文件与 Profile
- 代码控制与Profile
创建一个spring boot 项目
基于 Spring Boot 创建 Web 应用程序的方法有很多,我们选择在idea中直接进行创建,服务器URL选择Spring Initializer 网站,类型选择Maven项目,java版本根据jdk版本进行选择。
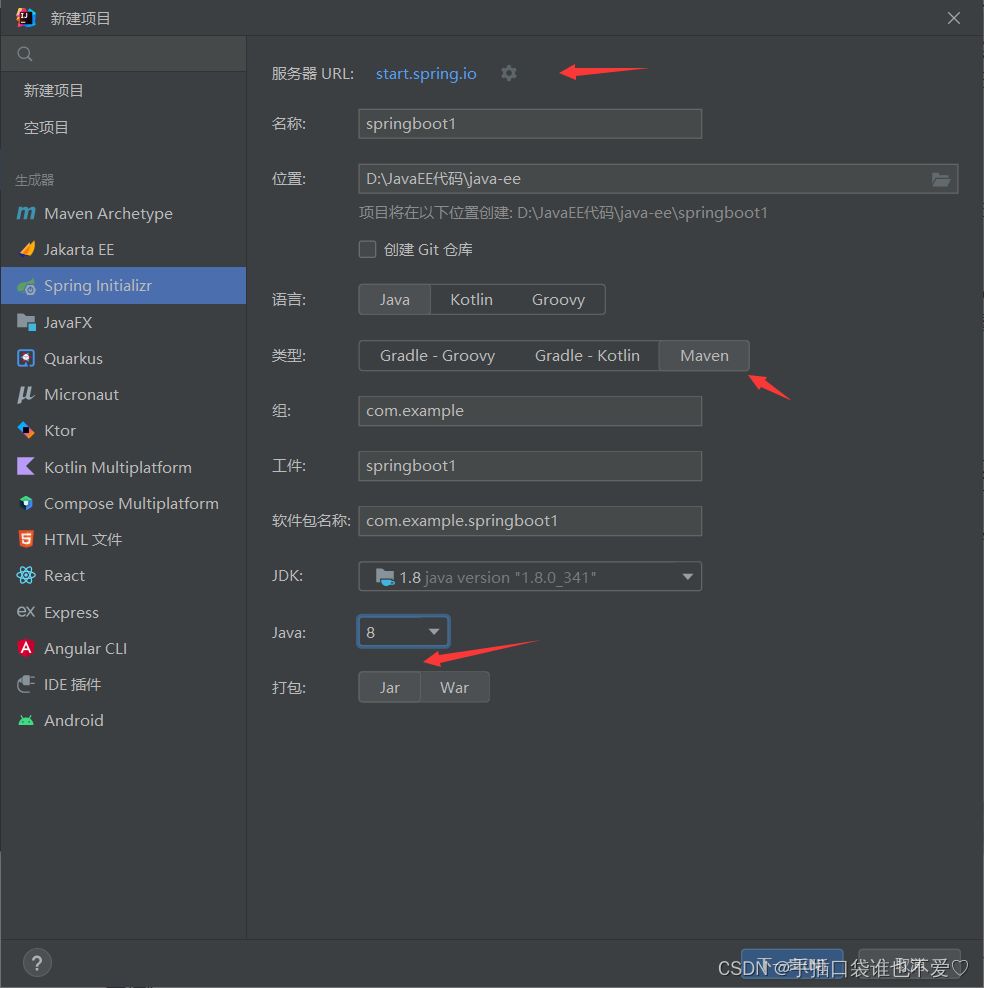
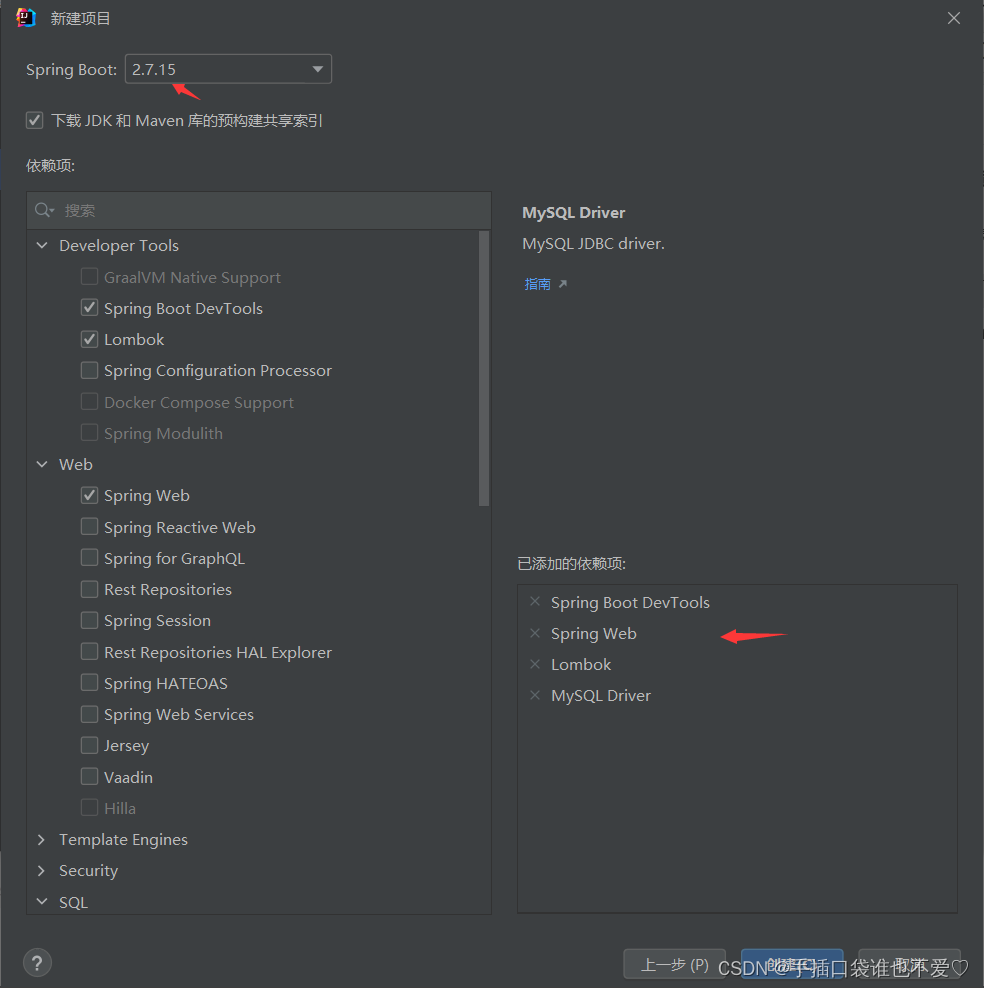
然后添加相应依赖以及选择spring boot版本
接下来我们写一个Controller
@RestController
@RequestMapping("/user")
public class UserController {
    // 请求映射,用于处理请求
    @RequestMapping("/zcx")
    public Userinfo getUserInfo() {
        // 创建Userinfo对象
        Userinfo userinfo = new Userinfo();
        // 设置age属性
        userinfo.setAge("45");
        // 设置name属性
        userinfo.setName("zcx-yyds");
        // 返回Userinfo对象
        return userinfo;
    }
}
现在我们需要对这个应用程序进行打包,使用idea上的打包工具,点击package进行打包
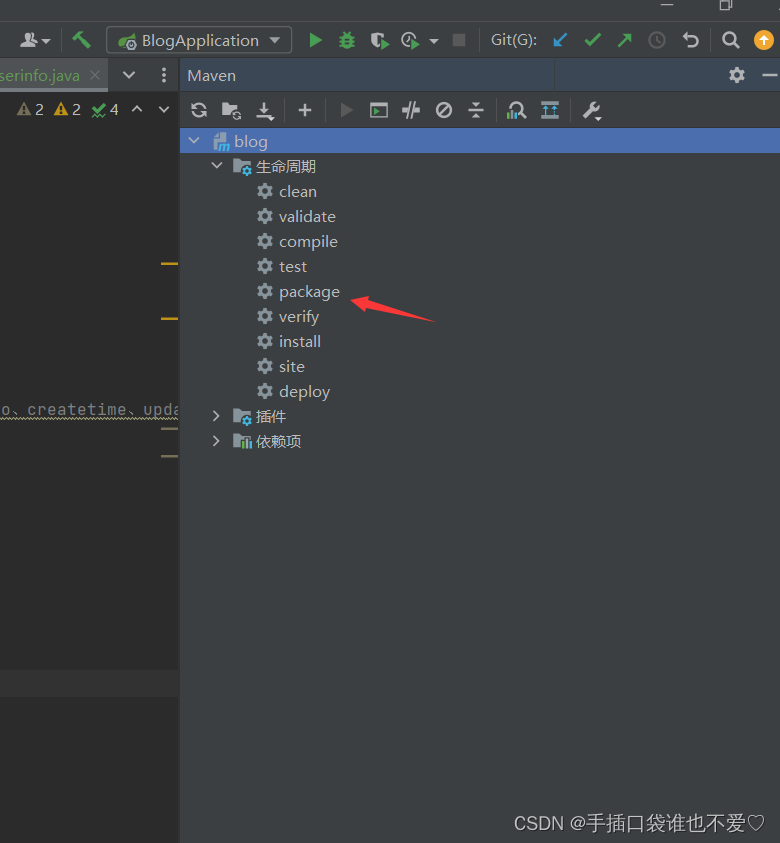
我们将得到一个springboot1-0.0.1-SNAPSHOT.jar文件,而这个 jar 文件就是可以直接运行的可执行文件,内置了 Tomcat Web 服务器。我们直接使用如下命令进行运行这个Spring boot程序。
java -jar springboot1-0.0.1-SNAPSHOT.jar
然后我们使用postman来进行项目访问测试,得到如下返回结果,证明我们的程序服务已经启动成功了。
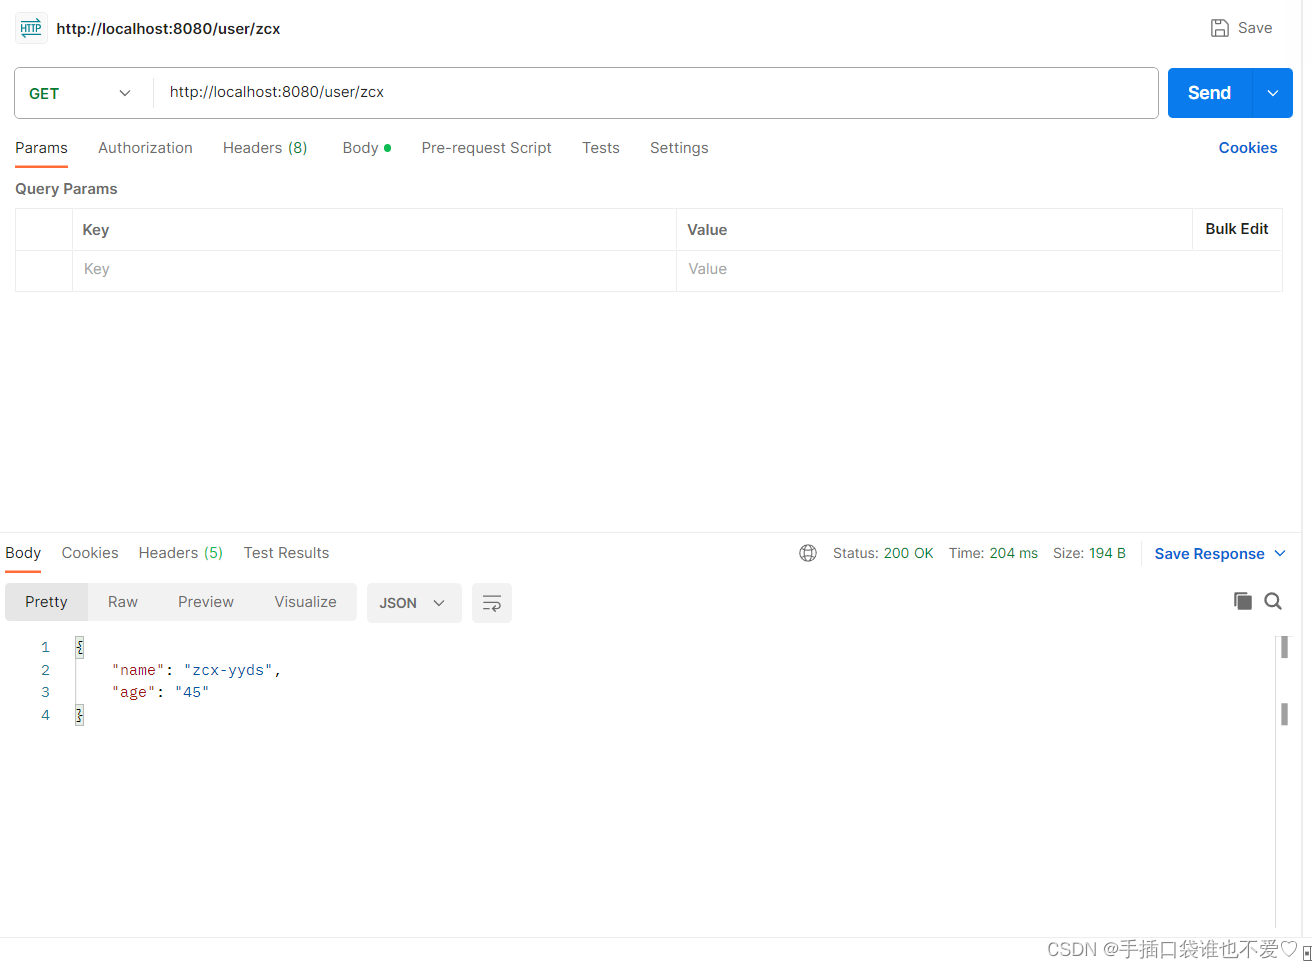
现在我们已经明白如何构建、打包以及运行一个简单的 Web 应用程序了。
spring boot 中的配置体系
在 Spring Boot 中,其核心设计理念是对配置信息的管理采用约定优于配置,也就是说约定大于配置。
Spring Boot中的Profile是一个非常有用的功能,它可以让我们在不修改代码的情况下,通过配置文件来控制程序的行为。
在Spring Boot中,Profile是一种用于控制应用程序行为的机制。通过使用不同的Profile,我们可以根据不同的环境或场景来加载不同的配置信息,从而实现应用程序的灵活配置。
配置文件与 Profile
根据环境的不同而存在很多套配置。假设我们存在如下所示的配置文件集合:
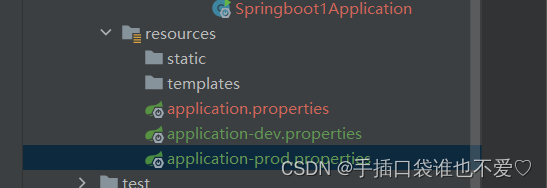
配置文件application-dev.properties中的代码为:
server.port=8080
spring.datasource.url=jdbc:mysql://localhost:3306/dev_db
spring.datasource.username=root
spring.datasource.password=666666
配置文件application-prod.properties中的代码为:
server.port=8080
spring.datasource.url=jdbc:mysql://localhost:3306/prod_db
spring.datasource.username=root
spring.datasource.password=666666
常见的配置文件命名方式有以下几种:
/{application}-{profile}.properties
/{label}/{application}-{profile}.properties
在 Spring Boot 中,我们可以在主 application.properties 中使用如下的配置方式来激活当前所使用的 Profile:
spring.profiles.active = dev
当然还有以下几种方式启动Profile:
- 在主 application.properties指定要激活的Profile。
spring.profiles.active = dev
- 在启动命令中指定Profile。
java -jar springboot1-0.0.1-SNAPSHOT.jar --spring.profiles.active=prod
- 在程序中显示设置Profile。例如:
@SpringBootApplication
public class Springboot1Application {
    public static void main(String[] args) {
        SpringApplication app = new SpringApplication(Springboot1Application.class);
        app.setAdditionalProfiles("dev");
        app.run(args);
    }
}
这将激活名为prod的Profile。
代码控制与Profile
在 Spring Boot 中,Profile 这一概念的应用场景还包括动态控制代码执行流程。为此,我们需要使用 @Profile 注解,Profile注解可以用于指定某个类或方法在特定的配置环境下生效。只要是被@Component或@Configuration注解的类都可以使用@Profile注解。
使用一个示例来了解Profile注解的使用方法:
@Configuration
public class DataSourceConfig {
    @Bean
    @Profile("dev")
    public DataSource devDataSource() {
        //创建 dev 环境下的 DataSource
        return null;
    }
    @Bean()
    @Profile("prod")
    public DataSource prodDataSource() {
        //创建 prod 环境下的 DataSource
        return null;
    }
}
通过这种方式,可以达到与使用配置文件相同的效果。
我们来看一个更为详细具体的例子:
- 创建一个接口 MyService:
public interface MyService { void doSomething(); }- 创建两个不同的实现类,分别用于不同的配置文件。
@Component
@Profile("prod")
public class ProdMyService implements MyService {
    @Override
    public void doSomething() {
        System.out.println("Prod service is running.");
    }
}
@Component @Profile("dev") public class DevMyService implements MyService { @Override public void doSomething() { System.out.println("Dev service is running."); } }上述示例中,我们创建了两个不同的实现类,一个用于 development 配置文件,另一个用于 production 配置文件。@Profile 注解分别标记了它们,以便 Spring 知道在哪个配置文件下激活它们。
3. 在 Spring 配置文件(例如 application.properties 或 application.yml)中指定要激活的配置文件,例如: application.properties:
spring.profiles.active=prod
将 spring.profiles.active 设置为 development,表示我们希望激活的开发配置文件。
4. 创建一个启动类,以演示如何使用 MyService:
@SpringBootApplication
public class Springboot1Application implements CommandLineRunner {
    // 声明一个注入的MyService对象
    @Autowired
    private MyService myService;
    // 声明一个名为run的方法,用来启动Spring应用
    public static void main(String[] args) {
        // 调用SpringApplication的run方法,传入Springboot1Application类和args参数
        SpringApplication.run(Springboot1Application.class, args);
    }
    // 方法run,用来执行Spring应用的业务逻辑
    @Override
    public void run(String... args) {
        // 调用myService的doSomething方法
        myService.doSomething();
    }
}
通过结果我们发现运行这个应用程序时,它会根据配置文件中的 spring.profiles.active 属性来选择相应的实现类。
如果你还想了解更多内容请参考spring boot官网。


